What an interesting topic I had recently regarding on security hardening Databricks using Secure cluster connectivity + vNet injection.
This configuration will allow the cluster to access Azure Data Lake Storage (I know right ?! what a popular combination!) and keyvault with private endpoint.
In this post, in a lab environment, we will find out how we can put Databricks cluster inside existing Azure virtual network and access private endpoint deployed inside it. For all infra related deployment I am going to use Terraform as much as possible to avoid any “ClickOps” efforts. Once Infra is done, we will run a quick notebook to validate the connectivity as well as DNS resolution
Part 1 Overall Architecture of the lab
 In this lab we will use databricks with secured connectivity and vNet injection to access some data residing in the ADLS with private endpoint configuration.
We will also create keyvault for keeping the secrets involved using private endpoint.
In the end we will use a simply python notebook to validate two things against the private Ip of the private endpoint:
In this lab we will use databricks with secured connectivity and vNet injection to access some data residing in the ADLS with private endpoint configuration.
We will also create keyvault for keeping the secrets involved using private endpoint.
In the end we will use a simply python notebook to validate two things against the private Ip of the private endpoint:
- the network connectivity
- DNS resolution
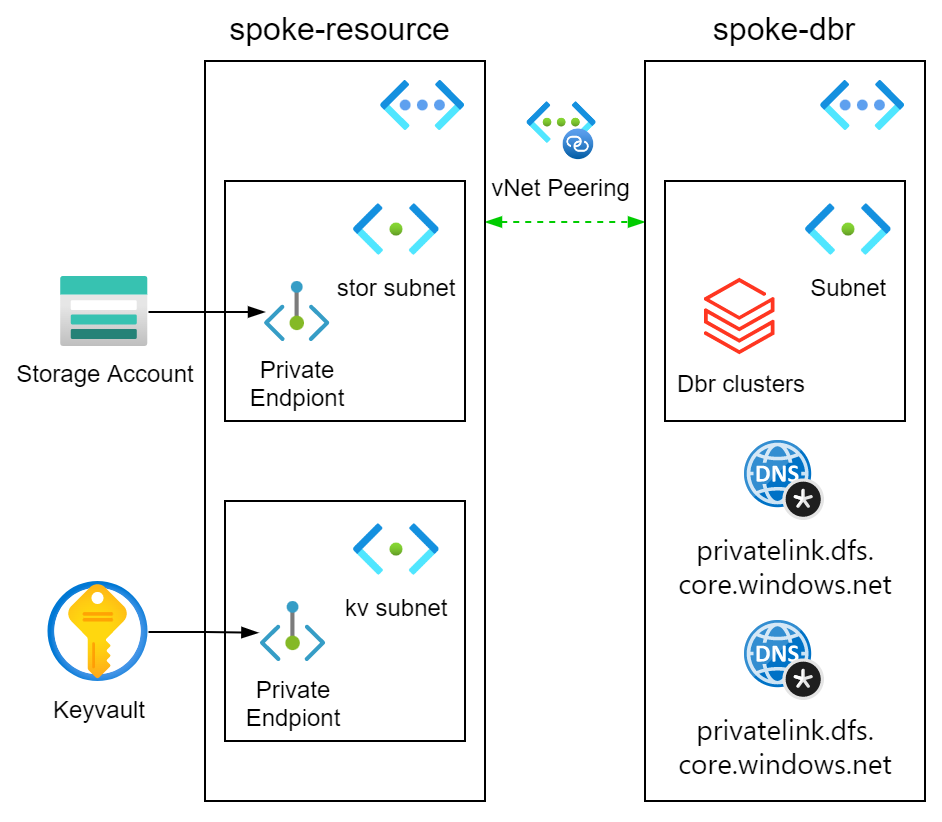
As revealed on the diagram, we are simulating a well adopted hub and spoke topology. In our case we don’t have any hub for this lab, but two spokes that connects to each other via vNet peering. For the storage account private endpoint, well, we could have deployed that into the databricks vNet and they would naturally have connectivity(and secured by NSG if needed). But that removes the fun of dealing with Networking and sometime there are enough reason on the design to keep the private endpoint virtual network separate from other virtual network. We will also create keyvault with private endpoint and use that for a KV backed secret scope in databricks. In a nutshell a secret scope is a way to securely store secrets such as service principal key or a storage account key or any other type of secrets as such, so that we do hard code and secrets but are able to use “dbutil” to retrieve the secrets in a notebook run. Simple but yet important principle right ? no hard coded secret in your source code !!!!
Project setup
├── README.md
├── data.tf
├── main.tf
├── output.tf
├── providers.tf
├── values.tfvars
├── variables.tf
└── .gitignore
For simplifying our demo, we are going to put all our terraform resources in the main.tf file. In real world development, the best practice would be modularize any components that are reusable. We are also simplifying the terraform variables with locals, you will find the only the authentication related values are kept in variables and passed in with values.tfvars file.
For your convenience, you can download tf module required for this lab from my github repo: secure-databricks-terraform
First thing before carry on to the next part is to setup the providers.
providers.tf
terraform {
  required_providers {
    azurerm = {
      source  = "hashicorp/azurerm"
      version = "2.97.0"
    }
    databricks = {
      source  = "databrickslabs/databricks"
      version = "0.5.1"
    }
    external = {
      source  = "hashicorp/external"
      version = "2.2.2"
    }
  }
}

provider "azurerm" {
  features {}
  subscription_id = var.subscription_id
  client_id       = var.client_id
  client_secret   = var.client_secret
  tenant_id       = var.tenant_id
}

provider "databricks" {
  host                        = format("https://%s", data.azurerm_databricks_workspace.dbr.workspace_url)
  azure_workspace_resource_id = data.azurerm_databricks_workspace.dbr.id
  azure_client_id             = var.client_id
  azure_client_secret         = var.client_secret
  azure_tenant_id             = var.tenant_id
}
Quick explanation:
line 16 to line 19 we use service principal to authenticate to azure, in here we use variables to represent the value so that later on we can specify the values.tfvars file and pass the value in. This is really handy if you need to deal with multiple Azure environment that has different auth service principals. Refer the official doc here.
To be able to use variables we will need to add the following to the variables file:
variable.tf
variable "subscription_id" {
  type = string
  default = "default"
}
variable "client_id" {
  type = string
  default = "default"
}
variable "client_secret" {
  type = string
  default = "default"
}
variable "tenant_id" {
  type = string
  default = "default"
}
line 23 to 27 similar deal here. One thing to note is that we are retrieving the databricks workspace url and resource id by using tf data object. The following needs to be added in the data.tf to achieve this.
data.tf
data "azurerm_databricks_workspace" "dbr" {
  name                = azurerm_databricks_workspace.dbr.name
  resource_group_name = local.rg
}
Lastly you will need to create a service principal that has contributor access to the subscription that you are about to deploy to. You can find more details in this office doc. Once Service principal is created you will need to create a secret and use that alone side with the application id to authentication to Azure. When finished, please create a values.tfvars file where you could input those required auth information for terraform to pass in as variables. The information required are:
- subscription id
- service principal client id
- service principal client secret
- azure tenant id.
values.tfvars
subscription_id = "xxxxxxxxx"
client_id       = "xxxxxxxxx"
client_secret   = "xxxxxxxxx"
tenant_id       = "xxxxxxxxx"
At this point we will need to initiate our terraform workspace by running:
terraform init
With that all set, lets move on to next part of creating actual resources.
Part 2 Virtual networks and peering
First we will add some variables to main.tf that we can use in the main file to the locals block
main.tf
locals {
  org           = "blk"
  rg            = "${local.org}-secure-dbr"
  rg_location   = "australiaeast"
  vnet_dbr      = "${local.org}-spoke-dbr"
  vnet_resource = "${local.org}-spoke-resource"

  vnet_dbr_address_space = "10.0.0.0/16"

  vnet_dbr_subnet_prv        = "private"
  vnet_dbr_subnet_prv_prefix = "10.0.1.0/24"

  vnet_dbr_subnet_pub        = "public"
  vnet_dbr_subnet_pub_prefix = "10.0.2.0/24"

  vnet_resource_address_space = "10.1.0.0/16"

  vnet_resource_subnet_stor        = "stor"
  vnet_resource_subnet_stor_prefix = "10.1.1.0/24"

  vnet_resource_subnet_kv        = "keyvault"
  vnet_resource_subnet_kv_prefix = "10.1.2.0/24"
}
Line 2 to line 6 defines some local variables that we can reuse to build up the name of vNets. Line 8 to 14 defines the databricks vNet. Line 16 to 22 defines the resource vNet which is used by storage account and keyvault.
2.1 Spoke vNet for databricks
Pretty standard configuration here, one thing to note is that the subnets name is dictated to be private and public. There are also requirements to the minimum size of the subnets, please refere to this doc for more details.
All we need to do is to add the following to main.tf next to the locals block.
main.tf
resource "azurerm_resource_group" "secure_dbr" {
  name     = local.rg
  location = local.rg_location
}

resource "azurerm_virtual_network" "vnet_dbr" {
  name                = local.vnet_dbr
  location            = local.rg_location
  resource_group_name = azurerm_resource_group.secure_dbr.name
  address_space       = [local.vnet_dbr_address_space]

  depends_on = [azurerm_resource_group.secure_dbr]
}

resource "azurerm_subnet" "dbr_prv" {
  name                 = local.vnet_dbr_subnet_prv
  resource_group_name  = local.rg
  virtual_network_name = azurerm_virtual_network.vnet_dbr.name
  address_prefixes     = [local.vnet_dbr_subnet_prv_prefix]

  delegation {
    name = "dbr_prv_dlg"
    service_delegation {
      name = "Microsoft.Databricks/workspaces"
      actions = [
        "Microsoft.Network/virtualNetworks/subnets/join/action",
        "Microsoft.Network/virtualNetworks/subnets/prepareNetworkPolicies/action",
        "Microsoft.Network/virtualNetworks/subnets/unprepareNetworkPolicies/action",
      ]
    }
  }
  depends_on = [azurerm_virtual_network.vnet_dbr]
}

resource "azurerm_subnet" "dbr_pub" {
  name                 = local.vnet_dbr_subnet_pub
  resource_group_name  = local.rg
  virtual_network_name = azurerm_virtual_network.vnet_dbr.name
  address_prefixes     = [local.vnet_dbr_subnet_pub_prefix]

  delegation {
    name = "dbr_pub_dlg"
    service_delegation {
      name = "Microsoft.Databricks/workspaces"
      actions = [
        "Microsoft.Network/virtualNetworks/subnets/join/action",
        "Microsoft.Network/virtualNetworks/subnets/prepareNetworkPolicies/action",
        "Microsoft.Network/virtualNetworks/subnets/unprepareNetworkPolicies/action",
      ]
    }
  }
  depends_on = [azurerm_virtual_network.vnet_dbr]
}
Quick explanation:
Line 1-4 defines the resource group. Line 6-13 defines the dbr vNet. Line 15-53 defines the private and public subnets for the clusters.
2.2 Spoke vNet for storage account and keyvault
Nothing complicated here, just need a separate subnets for storage account and keyvault private endpoints. Add the following to main.tf file.
resource "azurerm_virtual_network" "vnet_resource" {
  name                = local.vnet_resource
  location            = local.rg_location
  resource_group_name = azurerm_resource_group.secure_dbr.name
  address_space       = [local.vnet_resource_address_space]

  depends_on = [azurerm_resource_group.secure_dbr]
}

resource "azurerm_subnet" "resource_stor" {
  name                                           = local.vnet_resource_subnet_stor
  resource_group_name                            = local.rg
  virtual_network_name                           = azurerm_virtual_network.vnet_resource.name
  address_prefixes                               = [local.vnet_resource_subnet_stor_prefix]
  enforce_private_link_endpoint_network_policies = true

  depends_on = [azurerm_virtual_network.vnet_resource]
}

resource "azurerm_subnet" "resource_kv" {
  name                                           = local.vnet_resource_subnet_kv
  resource_group_name                            = local.rg
  virtual_network_name                           = azurerm_virtual_network.vnet_resource.name
  address_prefixes                               = [local.vnet_resource_subnet_kv_prefix]
  enforce_private_link_endpoint_network_policies = true

  depends_on = [azurerm_virtual_network.vnet_resource]
}
Quick explanation
Note the difference on the subnet compare to the above. Subnets provisioned for storage account and keyvault does not require subnet delegation. However it need the “Private endpoint network policy” to be enabled before any private endpoint can be deployed in it.
2.3 vNet peering
Virtual network peering ensures the connectivity between two virtual networks. In some environments direct spoke to spoke communication via peering is disable, all traffic between vNet peers goes via hub network, filtered and processed by firewall. However purpose of our lab is to focus on Databricks and private endpoints, we will use peering, a simpler setup to achieve spoke to spoke connectivity. I will write a separate article to talk about best practice of Hub-Spoke topology.
resource "azurerm_virtual_network_peering" "dbr_to_resource" {
  name                      = "dbr-vent-to-resource-vnet"
  resource_group_name       = local.rg
  virtual_network_name      = azurerm_virtual_network.vnet_dbr.name
  remote_virtual_network_id = azurerm_virtual_network.vnet_resource.id
}

resource "azurerm_virtual_network_peering" "resource_to_dbr" {
  name                      = "resource-vent-to-dbr-vnet"
  resource_group_name       = local.rg
  virtual_network_name      = azurerm_virtual_network.vnet_resource.name
  remote_virtual_network_id = azurerm_virtual_network.vnet_dbr.id
}
Quick explanation
The vNet peering needs to be setup from both directions, hence you find that there are two peering blocks required to achieve this.
Once you have all the code in, lets create resources in a iterative fashion by running
terraform plan -var-file=values.tfvars
followed by:
terraform apply -auto-approve -var-file=values.tfvars
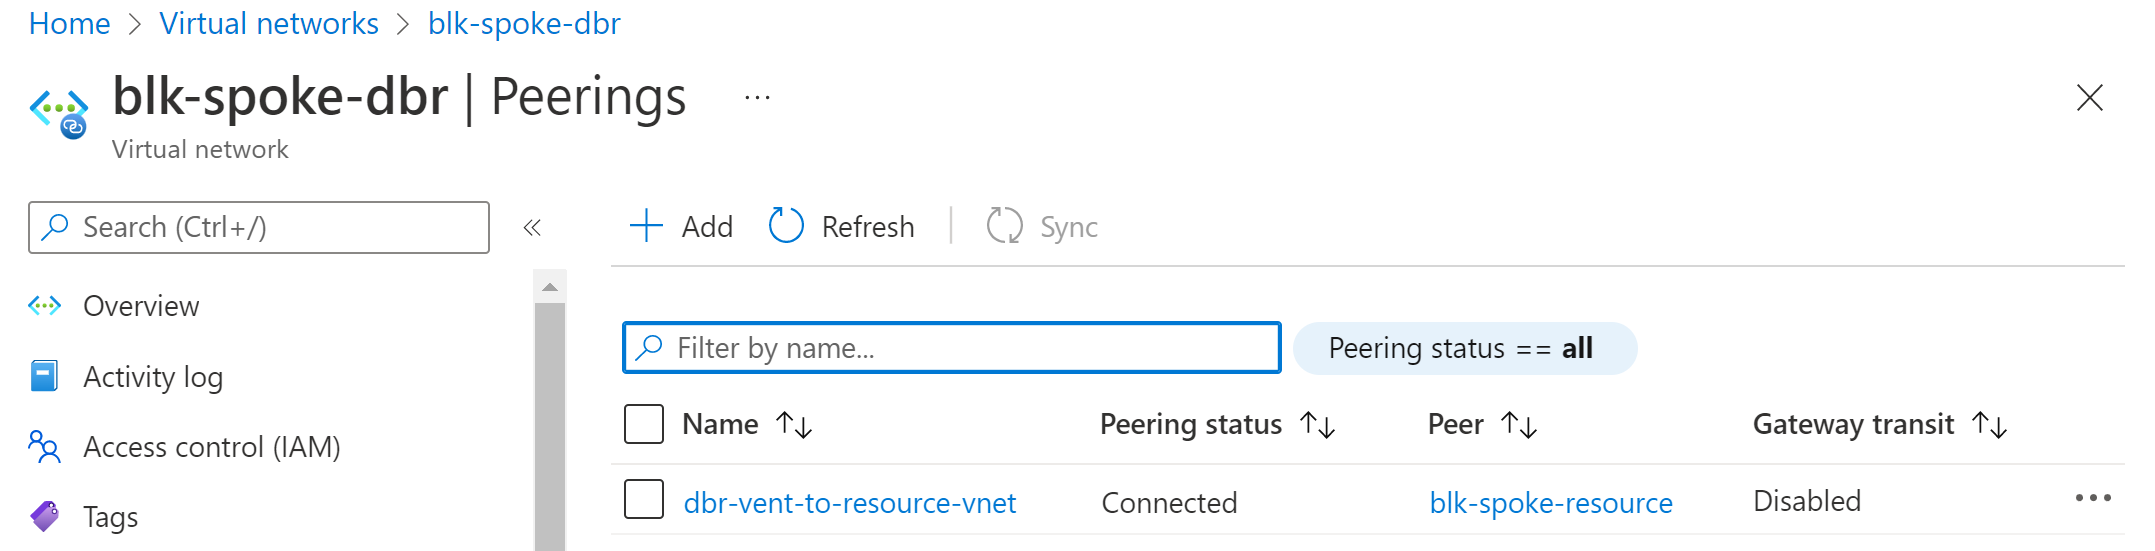
Let quickly go to the portal and validate that our vNets are created and peering is all connected.
Part 3 Databricks workspace and cluster
Lets create Databricks workspace and clusters in this part.
3.1 Databricks secure connectivity + vNet injection
To remove the exposure to public internet traffic, clusters can be deployed with no-pubip configuration and deployed into pre-defined vNet. First need to add the following to locals block:
dbr         = "${local.org}-secure-dbr"
dbr_sku     = "premium"
dbr_mgmt_rg = "${local.dbr}-mgmt-rg"
dbr_nsg     = "${local.org}-nsg"
dbr_cluster = "${local.org}-cluster"
Then add the following to main.tf
resource "azurerm_network_security_group" "dbr_nsg" {
  name                = local.dbr_nsg
  location            = local.rg_location
  resource_group_name = azurerm_resource_group.secure_dbr.name
}

resource "azurerm_subnet_network_security_group_association" "dbr_prv" {
  subnet_id                 = azurerm_subnet.dbr_prv.id
  network_security_group_id = azurerm_network_security_group.dbr_nsg.id
}

resource "azurerm_subnet_network_security_group_association" "dbr_pub" {
  subnet_id                 = azurerm_subnet.dbr_pub.id
  network_security_group_id = azurerm_network_security_group.dbr_nsg.id
}

resource "azurerm_databricks_workspace" "dbr" {
  name                = local.dbr
  resource_group_name = local.rg
  location            = local.rg_location
  sku                 = local.dbr_sku

  managed_resource_group_name = local.dbr_mgmt_rg

  custom_parameters {
    no_public_ip        = true
    virtual_network_id  = azurerm_virtual_network.vnet_dbr.id
    public_subnet_name  = azurerm_subnet.dbr_pub.name
    private_subnet_name = azurerm_subnet.dbr_prv.name

    public_subnet_network_security_group_association_id  = azurerm_subnet_network_security_group_association.dbr_pub.id
    private_subnet_network_security_group_association_id = azurerm_subnet_network_security_group_association.dbr_prv.id
  }
}
Quick explanation
Line 1-15 defines the network security group and the association, this is mandatory for databricks cluster vNet injection. Line 17-34 defines the databricks workspace with existing vNet and subnets. Line 26 configures databricks cluster to have not public IP.
3.2 Cluster creation
We will use terraform to create clusters, note we will need to add databricks provider to terraform which was already performed in earlier steps.
resource "databricks_cluster" "cluster" {
  cluster_name            = local.dbr_cluster
  spark_version           = data.databricks_spark_version.latest.id
  node_type_id            = data.databricks_node_type.smallest.id
  autotermination_minutes = 20
  spark_conf = {
    "spark.databricks.cluster.profile" : "singleNode"
    "spark.master" : "local[*]"
  }

  custom_tags = {
    "ResourceClass" = "SingleNode"
  }
}
you will also need to add the following to the data.tf file so that databricks provide can retrieve some information dynamically for the provisioning.
data.tf
data "databricks_spark_version" "latest" {}

data "databricks_node_type" "smallest" {
  local_disk = true
}
Quick explanation
The cluster we provisioned is single cluster which is capable enough to help to complete the lab.
Once you have all the code in, lets create resources in a iterative fashion by running
terraform plan -var-file=values.tfvars
followed by:
terraform apply -auto-approve -var-file=values.tfvars
Lets login to our databricks instance and validate the cluster is in place.

Part 4 ADLS + Keyvault with Private endpoint
Lets create ADLS account and Keyvault in this part with private endpoints and private DNS zones. private DNS zone is required so that a Azure private link DNS address could be resolved to the private IP address for the private endpoint.
4.1 Storage account with private endpoint and private DNS zone
This part shouldnt be too bad, a storage account with private endpoint deployed to the spoke network.
First need to add the following to the locals block:
stor         = "${local.org}stor"
stor_pe      = "${local.stor}pe"
stor_prv_con = "${local.stor}prvcon"

kv         = "${local.org}-kv"
kv_pe      = "${local.kv}pe"
kv_prv_con = "${local.kv}prvcon"
Then add the following to main.tf file:
resource "azurerm_storage_account" "stor" {
  name                = local.stor
  resource_group_name = local.rg

  location                 = local.rg_location
  account_tier             = "Standard"
  account_replication_type = "LRS"

  is_hns_enabled = true

  network_rules {
    default_action = "Deny"
    ip_rules       = [data.external.my_ip.result.ip]
  }
}

resource "azurerm_storage_container" "container" {
  name                  = "land"
  storage_account_name  = azurerm_storage_account.stor.name
  container_access_type = "private"
}

resource "azurerm_private_endpoint" "stor_pe" {
  name                = local.stor_pe
  location            = local.rg_location
  resource_group_name = local.rg
  subnet_id           = azurerm_subnet.resource_stor.id

  private_service_connection {
    name                           = local.stor_prv_con
    private_connection_resource_id = azurerm_storage_account.stor.id
    is_manual_connection           = false
    subresource_names              = ["dfs"]
  }
}

resource "azurerm_private_dns_zone" "stor_dfs" {
  name                = "privatelink.dfs.core.windows.net"
  resource_group_name = local.rg
}

resource "azurerm_private_dns_zone_virtual_network_link" "dbr_vnet_link_stor" {
  name                  = "dbr_vnet_link"
  resource_group_name   = local.rg
  private_dns_zone_name = azurerm_private_dns_zone.stor_dfs.name
  virtual_network_id    = azurerm_virtual_network.vnet_dbr.id
}

resource "azurerm_private_dns_a_record" "storpe_dns" {
  name                = local.stor
  zone_name           = azurerm_private_dns_zone.stor_dfs.name
  resource_group_name = local.rg
  ttl                 = 300
  records             = [azurerm_private_endpoint.stor_pe.private_service_connection.0.private_ip_address]
}
Quick explanation
Line 11-14 defined the firewall rules so that we are not open our storage account to public by default. Note the “data.external.my_ip.result.ip”, because we still want to be operate the storage account from out local machine hence the data block retrieve your current public ip and inject that to network policy. You will also need to add the following to your data.tf file:
data "external" "my_ip" {
  program = ["curl", "https://api.ipify.org?format=json"]
}
Line 23-35 created the private endpoint targeting the storage account resource. Line 37-47 creates a Azure private dns zone for ADLS, and link that to the dbr network, so that DNS request from the dbr network could use this for name resolution. Line 38 specifies the top level domain name for the storage account in the private DNZ zone. Line 49-55 creates a private DNS record using the private ip address of the network interface as part of private endpoint provisioning.
4.2 Keyvault with private endpoint and private DNS zone
This one is not too bad either, keyvualt with private endpoint deployed to the same spoke network with similar setup on the private DNS zone, vNet linkage and dns records
resource "azurerm_key_vault" "kv" {
  name                        = local.kv
  location                    = local.rg_location
  resource_group_name         = local.rg
  enabled_for_disk_encryption = true
  tenant_id                   = data.azurerm_client_config.current.tenant_id
  soft_delete_retention_days  = 7
  purge_protection_enabled    = false

  sku_name = "standard"

  network_acls {
    default_action = "Deny"
    bypass = "AzureServices"
    ip_rules = [data.external.my_ip.result.ip]
  }
}

resource "azurerm_private_endpoint" "kv_pe" {
  name                = local.kv_pe
  location            = local.rg_location
  resource_group_name = local.rg
  subnet_id           = azurerm_subnet.resource_kv.id

  private_service_connection {
    name                           = local.kv_prv_con
    private_connection_resource_id = azurerm_key_vault.kv.id
    is_manual_connection           = false
    subresource_names              = ["Vault"]
  }
}

resource "azurerm_private_dns_zone" "kv" {
  name                = "privatelink.vaultcore.azure.net"
  resource_group_name = local.rg
}

resource "azurerm_private_dns_zone_virtual_network_link" "dbr_vnet_link_kv" {
  name                  = "dbr_vnet_link_kv"
  resource_group_name   = local.rg
  private_dns_zone_name = azurerm_private_dns_zone.kv.name
  virtual_network_id    = azurerm_virtual_network.vnet_dbr.id
}

resource "azurerm_private_dns_a_record" "kvpe_dns" {
  name                = local.kv
  zone_name           = azurerm_private_dns_zone.kv.name
  resource_group_name = local.rg
  ttl                 = 300
  records             = [azurerm_private_endpoint.kv_pe.private_service_connection.0.private_ip_address]
}
Once you have all the code in, lets create resources in a iterative fashion by running
terraform plan -var-file=values.tfvars
followed by:
terraform apply -auto-approve -var-file=values.tfvars
Part 5 Databricks configuration - Keyvault backed secret scope
To create the keyvault backed secret scope, terraform provides a handy resource to do this. add the following to the main.tf files to achieve this.
resource "databricks_secret_scope" "kv" {
  name = "keyvault-managed"

  keyvault_metadata {
    resource_id = azurerm_key_vault.kv.id
    dns_name    = azurerm_key_vault.kv.vault_uri
  }
}
The tricky part here is that according to terraform this is only supported by azure cli authentication but NOT with service principal authentication. You will see error like this if service principal auth is used:
 what you will need to do is to comment out the azurerm authentication part in the providers.tf and then login to Azure using
az login
If you haven’t installed Az cli following this to install and read more details of this limitation here.
Part 6 Run notebook to validate
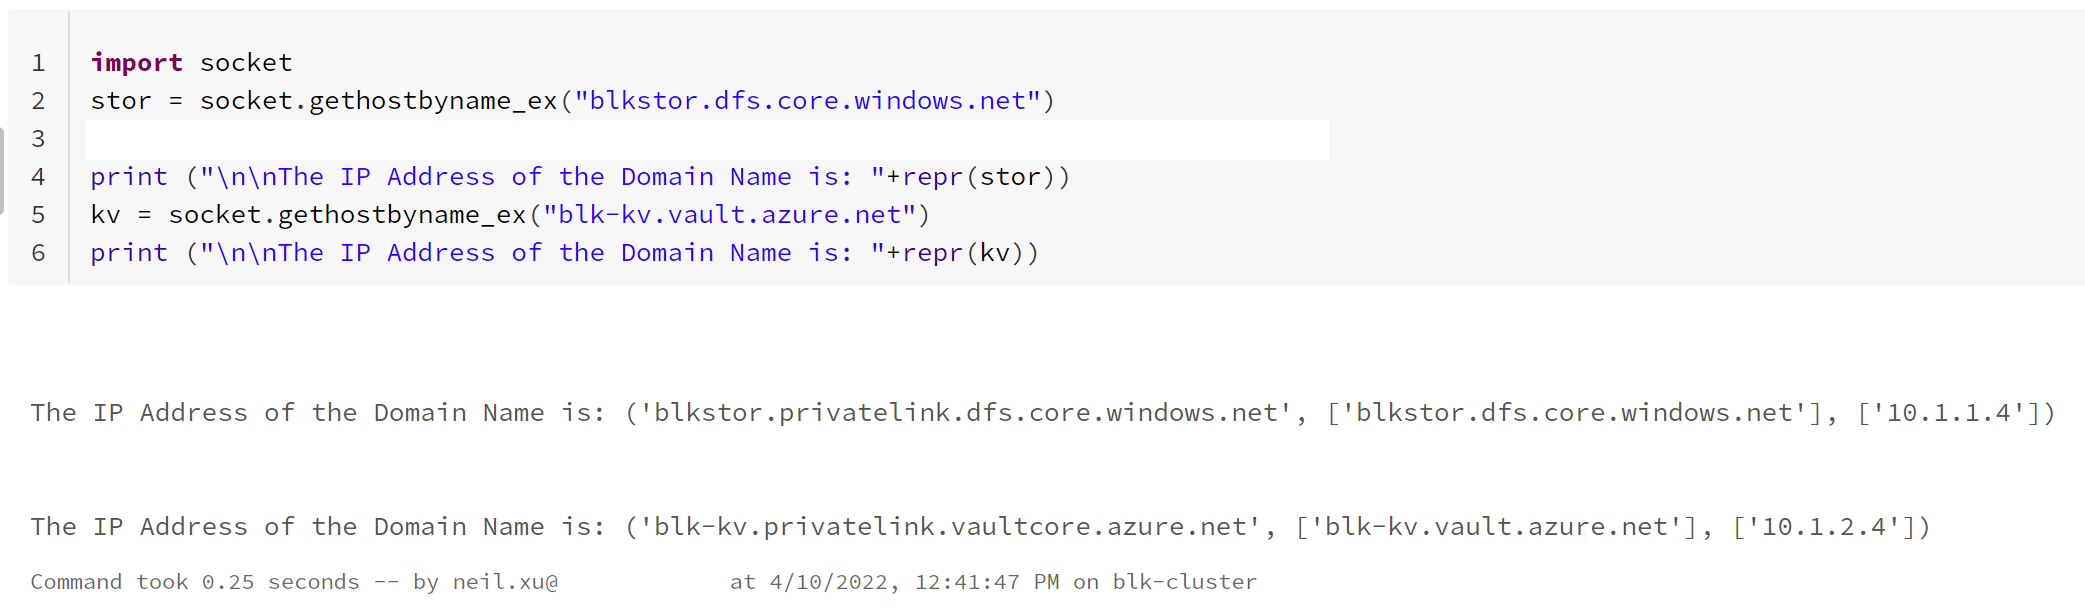
Let put some python code in and test the connectivity and DNS resolutions. The first and most important task is to validate the connectivity and DNS resolution. You can run this code snippet in a notebook to check them.
import socket
stor = socket.gethostbyname_ex("blkstor.dfs.core.windows.net")
print ("\n\nThe IP Address of the Domain Name is: " + repr(stor))
kv = socket.gethostbyname_ex("blk-kv.vault.azure.net")
print ("\n\nThe IP Address of the Domain Name is: " + repr(kv))
If all setup correctly you should be able to see that the DNS name is resolved with a private IP address.
If you are interest in further testing to read some file from ADLS you could use the following snippet to do so.
dbutils.widgets.text("adls_name",  "blkstor", "adls_name")
dbutils.widgets.text("adls_container",  "land", "adls_container")
# COMMAND ----------
adls_name = dbutils.widgets.get("adls_name")
adls_container = dbutils.widgets.get("adls_container")
# COMMAND ----------
spark.conf.set("fs.azure.account.auth.type", "OAuth")
spark.conf.set("fs.azure.account.oauth.provider.type", "org.apache.hadoop.fs.azurebfs.oauth2.ClientCredsTokenProvider")
spark.conf.set("fs.azure.account.oauth2.client.id", dbutils.secrets.get(scope="keyvault-managed",key="sp-id"))
spark.conf.set("fs.azure.account.oauth2.client.secret", dbutils.secrets.get(scope="keyvault-managed",key="sp-secret"))
spark.conf.set("fs.azure.account.oauth2.client.endpoint", "https://login.microsoftonline.com/xxxx-xxx-xxxxxx-xxxxxx/oauth2/token")

# COMMAND ----------
df = spark.read.json(f"abfss://{adls_container}@{adls_name}.dfs.core.windows.net/pubapis.json")
# COMMAND ----------
df.show()
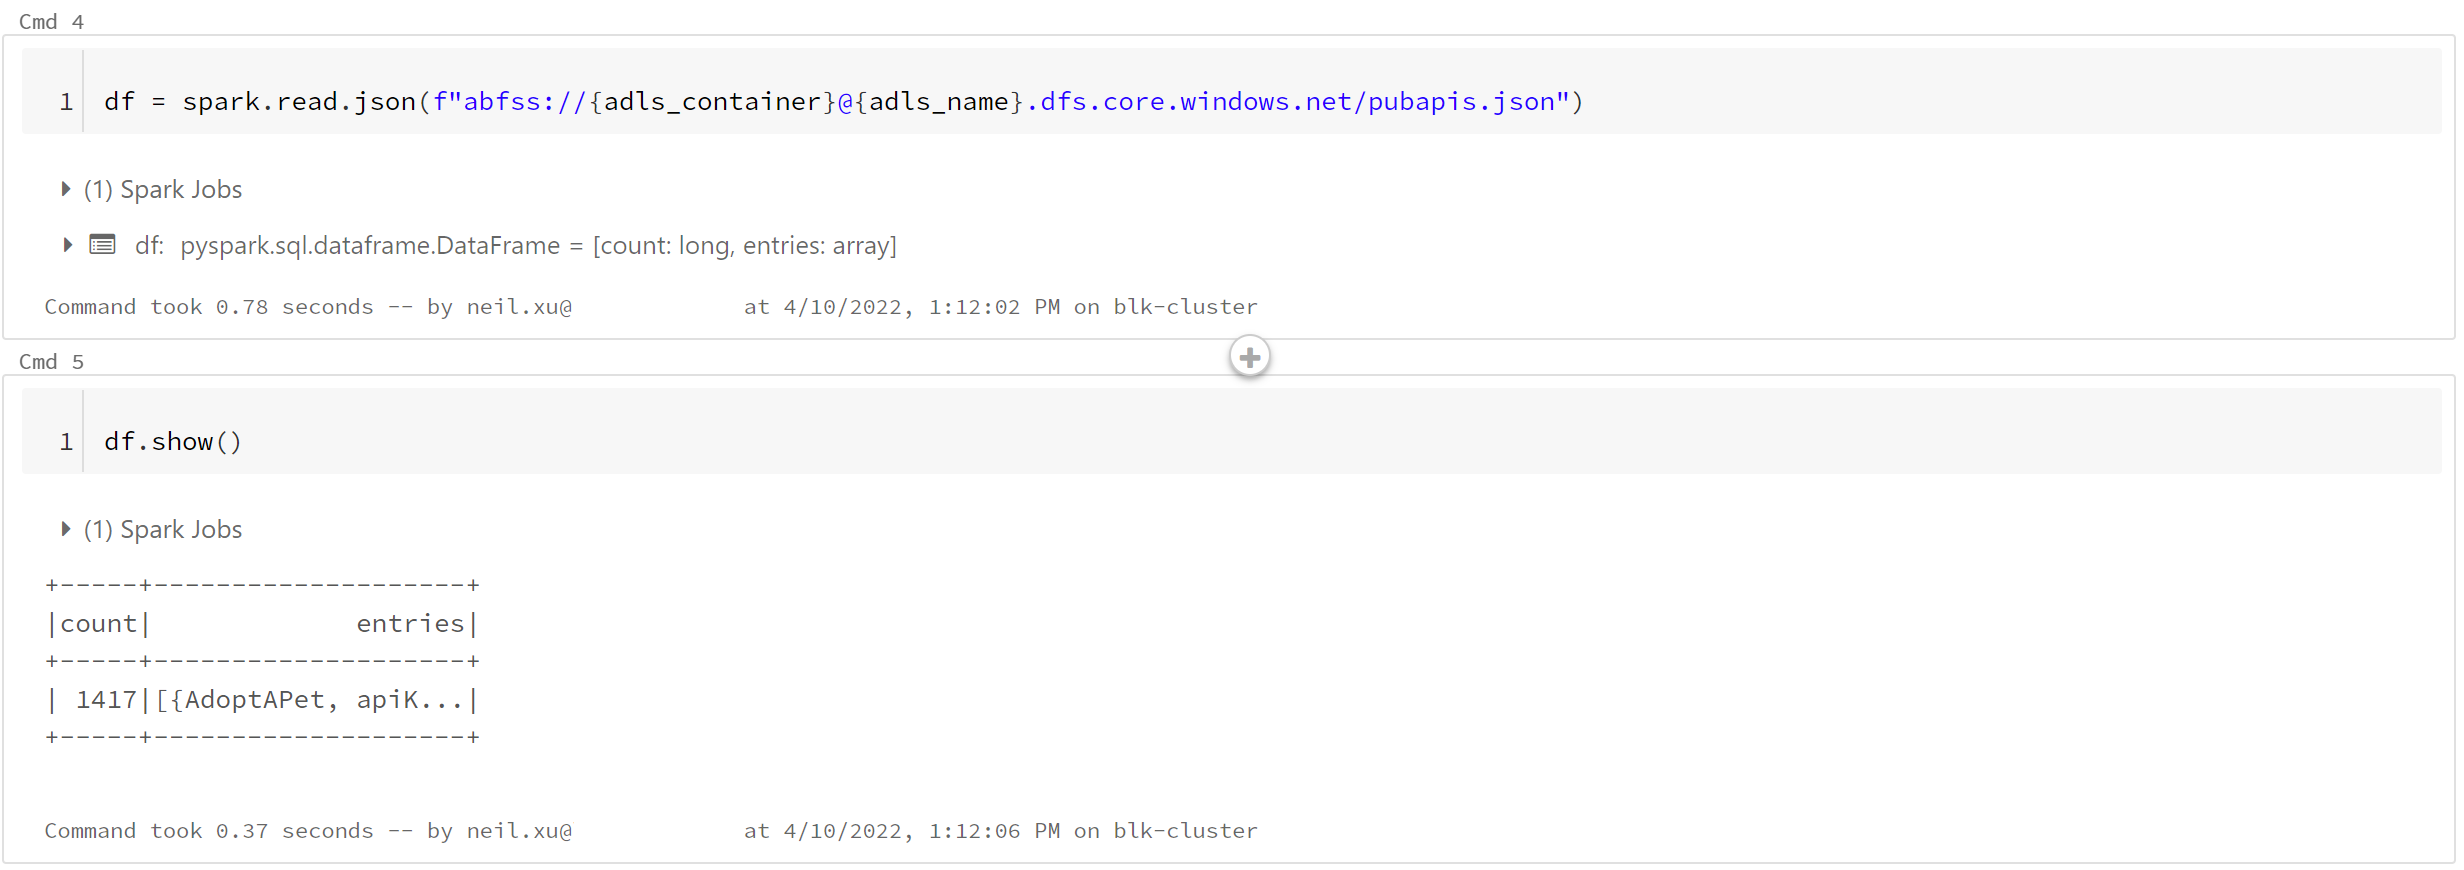
What this notebook does is quite simple, it grabs the secret of a service principal from keyvault secret scope and use that to auth to Azure.
Once authorized it will read a json file into dataframe. Please seethe outcome of the notebook run in the following screen shot.
To be able to achieve this, you will need the following:
- another service principal that has the role “Storage blob contributor” on the storage account
- having the application id and secret saved in the Keyvault we created as “sp-id” and “sp-secret”
I have included these two notebooks in the repo, you will find them in the notebooks folder.
To deploy the notebooks to our databricks workspace, you could add the following to your main.tf file as part of the deployment.
resource "databricks_notebook" "notbooks" {
  for_each = fileset("${path.module}/notebooks", "*")
  source = "${path.module}/notebooks/${each.key}"
  path   = "/validation/${element(split(".", each.key), 0)}"
  language = "PYTHON"
}
This block iterate through the notebooks folder and deploy the notebook in a folder called “validated” in the workspace.
At this point our lab has reached the end, hope you enjoyed the extra efforts needed to make your databricks cluster more secure.
If like the content please leave your comments below, if you find issues with the content, please also comment below. Thanks for your time and patience with me !!