The hub and spoke topology has been widely adopted for enterprise production deployment. In this lab, let put on our network/infrastructure engineer hat and get our hand dirty on Azure Hub and spoke topology with one of the popular IaC – Terraform. Lets have a look at the high level architecture first.
Overall architecture of the lab
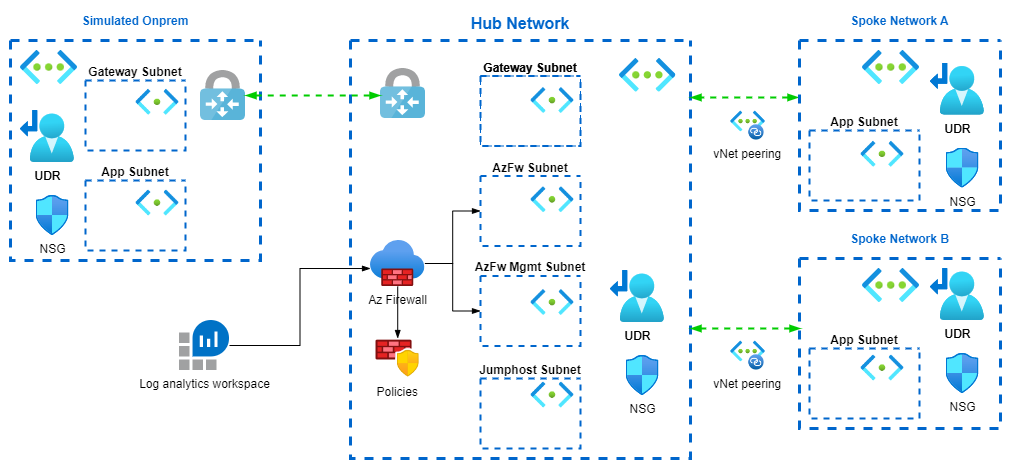 The essence of the topology is, by the name of it, having all traffic routed to hub before it gets forwarded to spoke. In hub network Azure firewall will be deployed, processing and logging all the traffic.
In spoke user defined route is configured to route the traffic to hub, one the traffic arrives hub and processed by firewall, policy will be applied depending on the requirement to either allow or deny.
We don’t have the luxury to have a on-prem VPN device with a VPN connection or express route, hence we are using another vNet and connect that to the hub via vNet gateway to simulate traffic passing through a gateway.
Please refer to the following table for address spaces for each of the vent.
The essence of the topology is, by the name of it, having all traffic routed to hub before it gets forwarded to spoke. In hub network Azure firewall will be deployed, processing and logging all the traffic.
In spoke user defined route is configured to route the traffic to hub, one the traffic arrives hub and processed by firewall, policy will be applied depending on the requirement to either allow or deny.
We don’t have the luxury to have a on-prem VPN device with a VPN connection or express route, hence we are using another vNet and connect that to the hub via vNet gateway to simulate traffic passing through a gateway.
Please refer to the following table for address spaces for each of the vent.
| vnet | address space | subnet | address prefix | subnet name can be customized |
|---|---|---|---|---|
| blk-hub | 10.0.0.0/16 | GatewaySubnet | 10.0.1.0/24 | no |
| AzureFirewallSubnet | 10.0.2.0/24 | no | ||
| AzureFirewallManagementSubnet | 10.0.3.0/24 | no | ||
| jump | 10.0.3.0/24 | yes | ||
| blk-spoke-a | 10.1.0.0/16 | app | 10.1.1.0/24 | yes |
| blk-spoke-b | 10.2.0.0/16 | app | 10.2.1.0/24 | yes |
| blk-spoke-onprem | 192.168.1.0/24 | GatewaySubnet | 192.168.1.0/26 | no |
| GatewaySubnet | 192.168.1.64/26 | no |
Project setup
The following represents the file structures we have in the project.
├── README.md
├── data.tf
├── main.tf
├── output.tf
├── providers.tf
├── values.tfvars
├── variables.tf
└── .gitignore
For simplifying our demo, we are going to put all our terraform resources in the main.tf file. In real world development, the best practice would be modularize any components that are reusable. We are also simplifying the terraform variables with locals, you will find the only the authentication related values are kept in variables whose values get passed in from values.tfvars file.
For your convenience, you can download tf module required for this lab from my github repo: networking-hub-spoke
First thing before carry on to the next part is to setup the providers.
providers.tf
terraform {
  required_providers {
    azurerm = {
      source  = "hashicorp/azurerm"
      version = "2.97.0"
    }
    databricks = {
      source  = "databrickslabs/databricks"
      version = "0.5.1"
    }
    external = {
      source  = "hashicorp/external"
      version = "2.2.2"
    }
  }
}

provider "azurerm" {
  features {}
  subscription_id = var.subscription_id
  client_id       = var.client_id
  client_secret   = var.client_secret
  tenant_id       = var.tenant_id
}
Quick explanation
We use service principal to authenticate to azure, in here we use variables to represent the value so that later on we can specify the values.tfvars file and pass the value in. This is really handy if you need to deal with multiple Azure environment that has different auth service principals. Refer the official doc here.
To be able to use variables we will need to add the following to the variables file:
variable.tf
variable "subscription_id" {
  type = string
  default = "default"
}
variable "client_id" {
  type = string
  default = "default"
}
variable "client_secret" {
  type = string
  default = "default"
}
variable "tenant_id" {
  type = string
  default = "default"
}
Lastly you will need to create a service principal that has contributor access to the subscription that you are about to deploy to. You can find more details in this office doc. Once Service principal is created you will need to create a secret and use that alone side with the application id to authentication to Azure. When finished, please create a values.tfvars file where you could input those required auth information for terraform to pass in as variables. The information required are:
- subscription id
- service principal client id
- service principal client secret
- azure tenant id.
values.tfvars
subscription_id = "xxxxxxxxx"
client_id       = "xxxxxxxxx"
client_secret   = "xxxxxxxxx"
tenant_id       = "xxxxxxxxx"
At this point we will need to initiate our terraform workspace by running:
terraform init
With that all set, lets move on to next part of creating actual resources.
Part 1 Create all vNets and subnets
In this part we will create all the vNets and subnets associated with it. We will also create the peerings for each of the vNets.
1.1 Create vNet
First we will need to add some variables in the locals block as mentioned previously.
Please add the first block of locals in your file.
main.tf
locals {
  org         = "blk"
  rg          = "${local.org}-hub-spoke"
  rg_location = "australiaeast"

  vnets = {
    vnet_hub    = { name = "${local.org}-hub", address_space = "10.0.0.0/16" }
    vnet_a      = { name = "${local.org}-spoke-a", address_space = "10.1.0.0/16" }
    vnet_b      = { name = "${local.org}-spoke-b", address_space = "10.2.0.0/16" }
    vnet_onprem = { name = "${local.org}-spoke-onprem", address_space = "192.168.1.0/24" }
  }
}
Quick explanation
Just wanted to quick go through how I setup the variables for all vNets. The vnets is a map object, essentially a key-value pair structure. If we look at the information of vent name and address spaces as the value of each of the vent properties, then the key would be the reference name of each of the vent property object. The information about each of the vent is grouped in such way that it can be iterated through the map object they form. when tf uses the vnet variable it would simply go into the value of eac key-value pair and retrieve the data from there.
Lets add the following to your main.tf and start creating first the resource group and the vNets
resource "azurerm_resource_group" "hub_spoke" {
  name     = local.rg
  location = local.rg_location
}

resource "azurerm_virtual_network" "hub_spoke" {
  for_each            = local.vnets
  name                = each.value["name"]
  location            = local.rg_location
  resource_group_name = azurerm_resource_group.hub_spoke.name
  address_space       = [each.value["address_space"]]
  depends_on          = [azurerm_resource_group.hub_spoke]
}
Quick explanation
In the second block we assign local.vnets which is map object to for_each expression, the expression is able to take each of the key-value pair and starting using them in the properties following it. You could then refer to each of the object in map by referring to key words each with syntax as the following:
name = each.value["name"]
The “each” keyword effectively points to every single key-value pair, the first one being
vnet_hub = { name = "${local.org}-hub", address_space = "10.0.0.0/16" }
In this “each” object, the “key” is “vnet_hub” and the “value” is “{ name = “${local.org}-hub”, address_space = “10.0.0.0/16” }”, therefore if I need the “name” property in the “value” inside each of the object, I would have “each.value[“name”]”. Please refer to tf doc for more information on for_each.
With this all set, lets run our tf and deploy the resource for the first time. Simply go:
terraform plan -var-file=values.tfvars
followed by
terraform apply -auto-approve -var-file=values.tfvars
If all sets up correctly, you should be able to see all the required vNet being created in the resource group.
1.2 Create subnets
They way subnets are created is pretty much similar to how vents were created, using for_each expression. add the following to you locals in you main.tf file
main.tf
subnets = {
  hub_gw            = { vnet = "${local.org}-hub", name = "GatewaySubnet", address_prefixes = "10.0.1.0/24" }
  hub_firewall      = { vnet = "${local.org}-hub", name = "AzureFirewallSubnet", address_prefixes = "10.0.2.0/24" }
  hub_firewall_mgmt = { vnet = "${local.org}-hub", name = "AzureFirewallManagementSubnet", address_prefixes = "10.0.3.0/24" }
  hub_jumphost      = { vnet = "${local.org}-hub", name = "jump", address_prefixes = "10.0.4.0/24" }
  a_app             = { vnet = "${local.org}-spoke-a", name = "app", address_prefixes = "10.1.1.0/24" }
  b_app             = { vnet = "${local.org}-spoke-b", name = "app", address_prefixes = "10.2.1.0/24" }
  onprem_gw         = { vnet = "${local.org}-spoke-onprem", name = "GatewaySubnet", address_prefixes = "192.168.1.0/26" }
  onprem_app        = { vnet = "${local.org}-spoke-onprem", name = "app", address_prefixes = "192.168.1.64/26" }
}
Add the following resources to our main.tf as well
main.tf
resource "azurerm_subnet" "hub-spoke" {
  for_each                                       = local.subnets
  name                                           = each.value["name"]
  resource_group_name                            = local.rg
  virtual_network_name                           = each.value["vnet"]
  address_prefixes                               = [each.value["address_prefixes"]]
  enforce_private_link_endpoint_network_policies = true

  depends_on = [azurerm_virtual_network.hub_spoke]
}
Again run:
terraform plan -var-file=values.tfvars
followed by
terraform apply -auto-approve -var-file=values.tfvars
If all sets up correctly, you should be able to see all the required subnets created inside our vnets.
1.3 Create peerings between vNets
Lets create the peerings as well to wire up the spoke vents with hub vnets. Add the following vars in you locals
main.tf
peering = {
  hub_to_spoke_a = { name = "${local.vnets.vnet_hub.name}-to-${local.vnets.vnet_a.name}", vnet = "vnet_hub", remote = "vnet_a", use_remote_gw = false }
  spoke_a_to_hub = { name = "${local.vnets.vnet_a.name}-to-${local.vnets.vnet_hub.name}", vnet = "vnet_a", remote = "vnet_hub", use_remote_gw = true }
  hub_to_spoke_b = { name = "${local.vnets.vnet_hub.name}-to-${local.vnets.vnet_b.name}", vnet = "vnet_hub", remote = "vnet_b", use_remote_gw = false }
  spoke_b_to_hub = { name = "${local.vnets.vnet_b.name}-to-${local.vnets.vnet_hub.name}", vnet = "vnet_b", remote = "vnet_hub", use_remote_gw = true }
}
as well as the following resources:
main.tf
resource "azurerm_virtual_network_peering" "hub_to_spoke_a" {
  for_each                     = local.peering
  name                         = each.value["name"]
  resource_group_name          = local.rg
  virtual_network_name         = azurerm_virtual_network.hub_spoke[each.value["vnet"]].name
  remote_virtual_network_id    = azurerm_virtual_network.hub_spoke[each.value["remote"]].id
  allow_virtual_network_access = true
  allow_forwarded_traffic      = true
  allow_gateway_transit        = true
  use_remote_gateways          = each.value["use_remote_gw"]
}
Let now run terraform plan and terraform apply to create the peering, please follow steps in previous part for the code snippet.
Once done we should be able to validate the peering connection by inspecting the connection status.

1.3 Create onprem vnet to hub vnet VPN connection
VNet peering will help us wiring up spokes with hub, for the part of simulating onprem network connecting to hub, we will need to setup the vNet to vNet VPN connection. The real world vNet to vNet VPN connection is commonly used to establish connectivity between vNet along side vNet peering. For the use case where use need to decide which one to choose, please refer to this doc. Lets add some vars to our locals block again.
gw = {
  hub_gw    = { name = "${local.org}-hub-gw", ip = "${local.org}-hub-gw-ip", vpn_name = "${local.org}-onprem-hub", peer = "onprem_gw" }
  onprem_gw = { name = "${local.org}-onprem-gw", ip = "${local.org}-onprem-gw-ip", vpn_name = "${local.org}-hub-onprem", peer = "hub_gw" }
}
Quick explanation
Again all the information needed for creating VPN connection is in the key-value pair. We will need to create a public IPs for the gateway resource, and once gateway resources are provisioned we will setup the connection between them. Add the following resources to your main.tf file
resource "azurerm_public_ip" "gw_ip" {
  for_each            = local.gw
  name                = each.value["ip"]
  location            = local.rg_location
  resource_group_name = azurerm_resource_group.hub_spoke.name
  allocation_method   = "Dynamic"
  sku                 = "Basic"
}

resource "azurerm_virtual_network_gateway" "gw" {
  for_each            = local.gw
  name                = each.value["name"]
  location            = local.rg_location
  resource_group_name = azurerm_resource_group.hub_spoke.name

  type     = "Vpn"
  vpn_type = "RouteBased"

  active_active = false
  enable_bgp    = false
  sku           = "VpnGw1"

  ip_configuration {
    name                          = "vnetGatewayConfig"
    public_ip_address_id          = azurerm_public_ip.gw_ip[each.key].id
    private_ip_address_allocation = "Dynamic"
    subnet_id                     = azurerm_subnet.hub-spoke[each.key].id
  }
}

resource "azurerm_virtual_network_gateway_connection" "hub_onprem" {
  for_each            = local.gw
  name                = each.value["vpn_name"]
  location            = local.rg_location
  resource_group_name = azurerm_resource_group.hub_spoke.name

  type                            = "Vnet2Vnet"
  virtual_network_gateway_id      = azurerm_virtual_network_gateway.gw[each.key].id
  peer_virtual_network_gateway_id = azurerm_virtual_network_gateway.gw[each.value["peer"]].id

  shared_key = "microsoft"
}
Quick explanation
The first block of resources iteratively define the public IP addresses that are going to be used by the gateway resource. The second block of resources are the gateways, which will need to be deployed inside the GatewaySubnets of both onprem vNet and hub vNet. The third block of resources are the VPN connections, please not the the type is “Vnet2Vnet”. In a real world scenario you would setup your onprem to azure connectivity via site to site VPN or ideally express route.
At this point we should have our VPN all connected which can be verified by inspecting the connection status in the portal.
1.4 Create firewall instance
Next up lets create the firewall instance. The firewall instance we created has the forced tunneling option enabled. Please refer to Microsoft doc for more information on the tunneling option. With this option you will need a additional subnets in the hub vnet with is designated as the management subnet. So lets add more vars to our locals block:
fw_name   = "${local.org}-azfw"
fw_policy = "${local.org}-fw-policy"

fw_ip = {
  fw_ip      = { name = "${local.org}-fw-ip" }
  fw_mgmt_ip = { name = "${local.org}-fw-mgmt-ip" }
}
add add the following firewall to our main.tf as well.
resource "azurerm_firewall_policy" "fw_policy" {
  name                = local.fw_policy
  resource_group_name = azurerm_resource_group.hub_spoke.name
  location            = local.rg_location
}

resource "azurerm_public_ip" "fw_ip" {
  for_each            = local.fw_ip
  name                = each.value["name"]
  location            = local.rg_location
  resource_group_name = azurerm_resource_group.hub_spoke.name
  allocation_method   = "Static"
  sku                 = "Standard"
}

resource "azurerm_firewall" "fw" {
  name                = local.fw_name
  location            = local.rg_location
  resource_group_name = azurerm_resource_group.hub_spoke.name
  firewall_policy_id  = azurerm_firewall_policy.fw_policy.id

  ip_configuration {
    name                 = "ipconfig"
    subnet_id            = azurerm_subnet.hub-spoke["hub_firewall"].id
    public_ip_address_id = azurerm_public_ip.fw_ip["fw_ip"].id
  }

  management_ip_configuration {
    name                 = "mgmt_ipconfig"
    subnet_id            = azurerm_subnet.hub-spoke["hub_firewall_mgmt"].id
    public_ip_address_id = azurerm_public_ip.fw_ip["fw_mgmt_ip"].id
  }
}
Quick explanation
The first code block create a new firewall policy object. With The new policy resource sits outside of the firewall resource, if you need to redeploy the firewall for configuration changes, the policy resource remains untouched. Here we decided to create black policy object and attach to the firewall at time of creation. The second block of resources creates the public IPs used by the firewall. The third block of resource is obviously the firewall resource with reference to the firewall policy and the public Ips.
Lets also run terraform plan as well as terraform apply to get the firewall in our vnet.
1.5 Create user defined route and firewall policies
With all the resources setup and ready to go, the next step would be create some user defined routes and associated them to the vNet and subnets. For simplicity we will just focus on what needed to get the lab going, in a production environment you will have more complicated routes and firewall policies to meet your organization’s networking and security requirements. Let first add some vars to the locals. To begin with, we will need to create baseline policy rule collection which denies all traffice. If you need to understand the hierarchical strucutre of policy rules and policy rule collections, please refer to Microsoft doc.
resource "azurerm_firewall_policy_rule_collection_group" "fw_rules_deny" {
  name               = local.fw_rules_group_deny
  firewall_policy_id = azurerm_firewall_policy.fw_policy.id
  priority           = 1000

  network_rule_collection {
    name     = "deny_netowrk_rule_coll"
    priority = 1000
    action   = "Deny"
    rule {
      name                  = "deny_all"
      protocols             = ["TCP", "UDP", "ICMP"]
      source_addresses      = ["*"]
      destination_addresses = ["*"]
      destination_ports     = ["*"]
    }
  }
}
secondly lets selectively apply some allow rules for our lab. Lets put our rules in plain words first and then create policy rules based on that. I have the following table to help me formulate my policies provide justification. Again when doing this in your production consult your network and security engineers.
| from | to | action | protocol | reasoning |
|---|---|---|---|---|
| * | * | deny | all | Baseline policy to deny all traffic |
| my workstation | * | allow | TCP | If I create any jumphost in the hub, we need to be able to rdp into it from our work station |
| jumphost | * | allow | TCP,UDP,ICMP | Jumphost need to be able to connect to VMs in the spoke |
| vnet a | vnet b/onprem | allow | TCP,UDP,ICMP | This is a arbitrary rule that allow communication from vNet a to vNet b and onprem network |
| vnet b | vnet a | allow | TCP,UDP,ICMP | arbitrary rule that allows communication from vnet b to vnet a only |
| onprem | * | allow | TCP,UDP,ICMP | rule to allow onprem to connect to all vms in spokes |
with all these in place, lets start building the firewall rules. Add the following to the main.tf
resource "azurerm_firewall_policy_rule_collection_group" "fw_rules_allow" {
  name               = local.fw_rules_group_allow
  firewall_policy_id = azurerm_firewall_policy.fw_policy.id
  priority           = 500

  network_rule_collection {
    name     = "allow_network_rule_coll"
    priority = 500
    action   = "Allow"
    rule {
      name                  = "allow_blk"
      protocols             = ["TCP"]
      source_addresses      = [data.external.my_ip.result.ip]
      destination_addresses = ["*"]
      destination_ports     = ["*"]
    }

    rule {
      name                  = "allow_hub_jumphost"
      protocols             = ["TCP"]
      source_addresses      = [local.subnets.hub_jumphost.address_prefixes]
      destination_addresses = ["*"]
      destination_ports     = ["*"]
    }

    rule {
      name                  = "allow_a_to_b_and_onprem"
      protocols             = ["TCP", "UDP", "ICMP"]
      source_addresses      = [local.subnets.a_app.address_prefixes]
      destination_addresses = [local.subnets.b_app.address_prefixes, local.subnets.onprem_app.address_prefixes]
      destination_ports     = ["*"]
    }

    rule {
      name                  = "allow_b_to_a"
      protocols             = ["TCP", "UDP", "ICMP"]
      source_addresses      = [local.subnets.b_app.address_prefixes]
      destination_addresses = [local.subnets.a_app.address_prefixes]
      destination_ports     = ["*"]
    }

    rule {
      name                  = "allow_onprem_to_all"
      protocols             = ["TCP", "UDP", "ICMP"]
      source_addresses      = [local.subnets.onprem_app.address_prefixes]
      destination_addresses = ["*"]
      destination_ports     = ["*"]
    }
  }

  nat_rule_collection {
    name     = "nat_rule_coll"
    priority = 400
    action   = "Dnat"
    rule {
      name                = "jumphost_rdp"
      protocols           = ["TCP"]
      source_addresses    = [data.external.my_ip.result.ip]
      destination_address = "20.227.0.88"
      destination_ports   = ["3387"]
      translated_address  = "10.0.4.4"
      translated_port     = "3389"
    }
  }
}
Quick explanation
Each of the rule we had in the table will have a rule block to reflect what was planned. The last block is a nat rule where the firewall IP address can be used to NATted that to the jumphost private IP.
Lets run terraform plan and terraform apply.
Part 3 Create some VMs to validate the traffic
Lets create some vm in each of the app subnets and test the connectivity. For simplicity, create the VM with a public IP and access from your workstation.
3.1 Create some VMs
Manually create the VMs in the app network, for creating VMs with integration to subnet please refer to this doc.
3.2 Ping tests
Test 1 Connectivity from vNet_a.
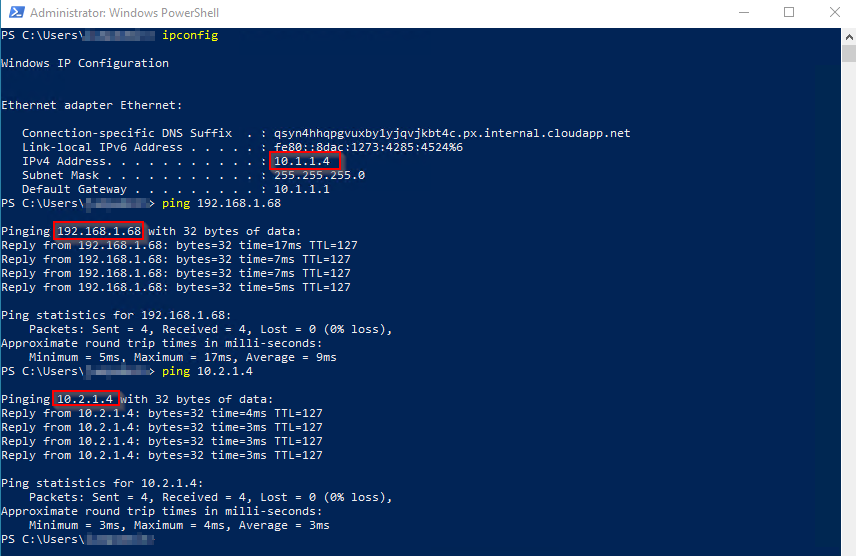 We are able to that VM in app subnet in vNet_a is able to ping VM in vNet_b and onprem.
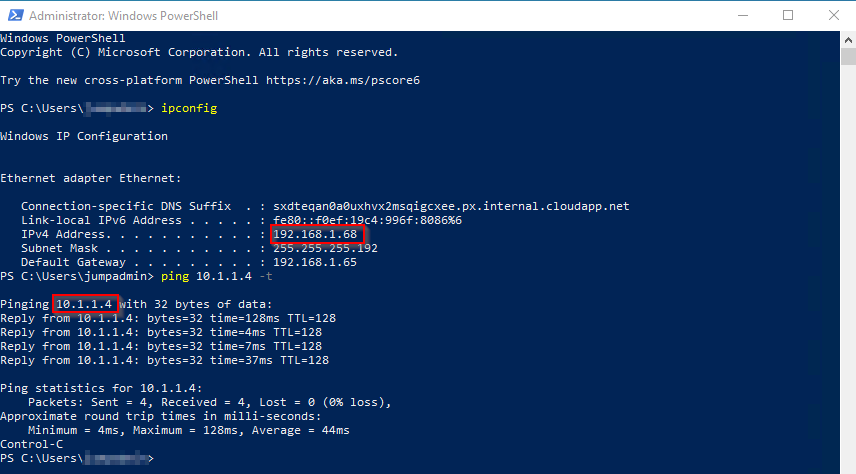
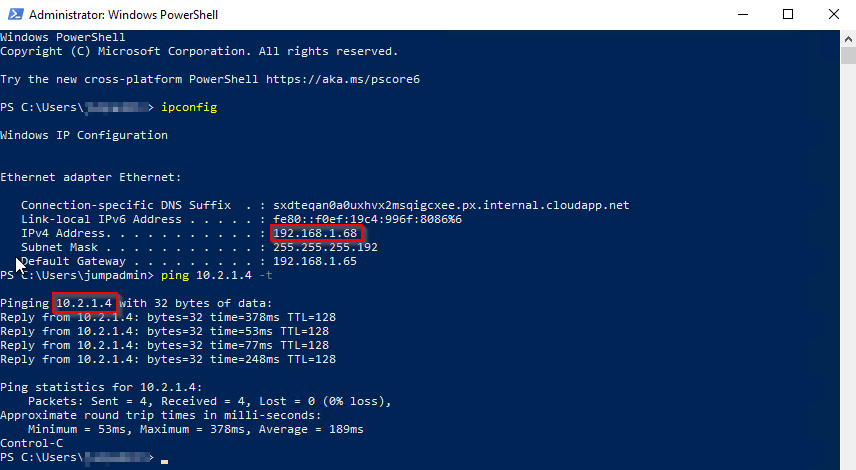
Test 2 Connectivity from onpmrem network.
Part 4 Azure log analytics analysis
We are also able to inspect the traffic once we enable Log Analytics for firewall. Follow this to enable diagnostic loggings.
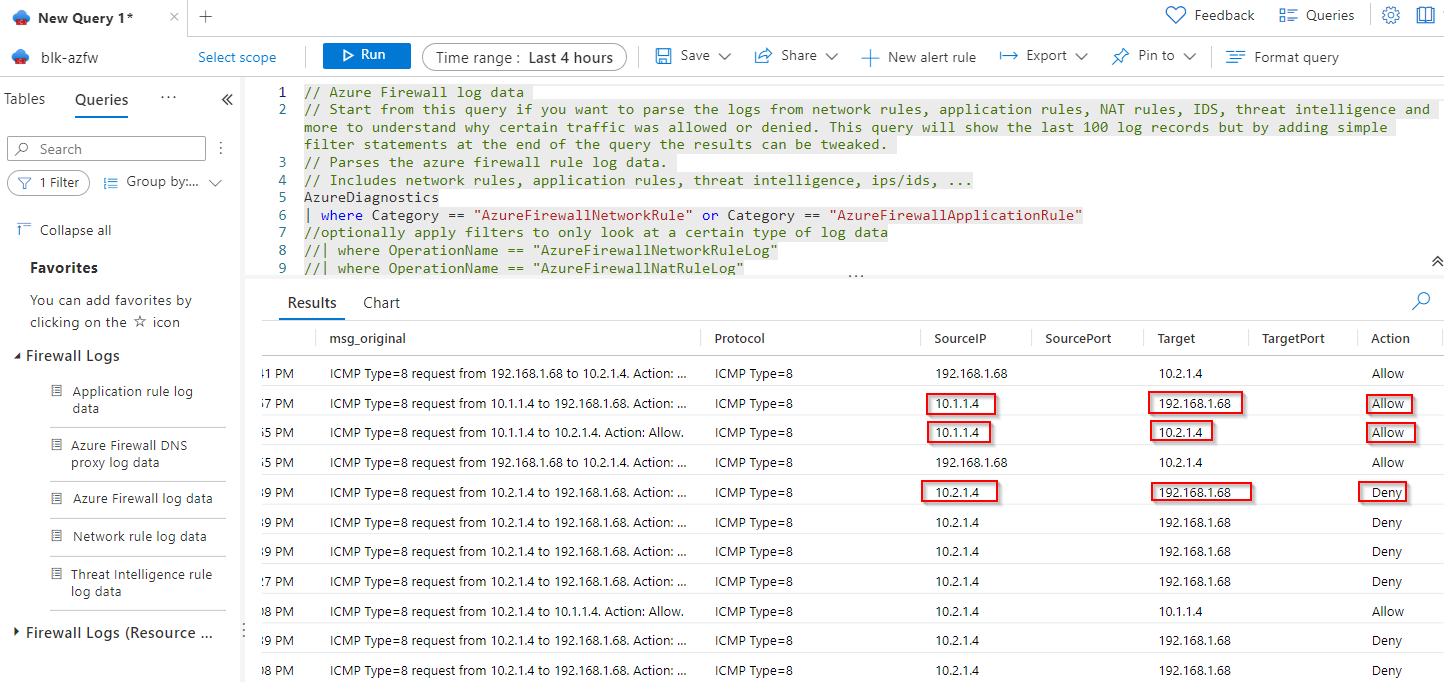 As shown on the screen shot we have firewall logging all the traffic including allowed and denied traffic.
VM from vNet_a has connectivity to VMs in vNet_b and VMs in onprem network.
VM from vNet_b has connectivity to VMs in vNet_b but not VMs in onprem network.
As shown on the screen shot we have firewall logging all the traffic including allowed and denied traffic.
VM from vNet_a has connectivity to VMs in vNet_b and VMs in onprem network.
VM from vNet_b has connectivity to VMs in vNet_b but not VMs in onprem network.
Congrats! you’v reached the end of this post, thanks for your patience! Please leave your comments at the bottom if you find this post helpful! Cheers !