 Purview has been published by Microsoft as a unified data governance solution to help manage and govern your multi-cloud, SaaS and on prem data. You can create a holistic and up-to-date view of your data landscape with automated data discovery, data classification and end to end lineage. This provides data users with valuable, trustworthy data management.
While the auto scanned lineage is useful most of the times, there are always cases where you need to manually generate your lineage graph. Apache Spark is one of those examples where you might need to build the lineage manually from time to time.
Purview has been published by Microsoft as a unified data governance solution to help manage and govern your multi-cloud, SaaS and on prem data. You can create a holistic and up-to-date view of your data landscape with automated data discovery, data classification and end to end lineage. This provides data users with valuable, trustworthy data management.
While the auto scanned lineage is useful most of the times, there are always cases where you need to manually generate your lineage graph. Apache Spark is one of those examples where you might need to build the lineage manually from time to time.
In this post, let’s explore how we can do that with pyapacheatlas in python, alternatively if you are planning to build you custom solution, you might want to refer to Purview REST API. We will start with using Databricks to run some sample transformation, then we will create a Purview instance and do some data sources scanning. Once completed, we will create the lineage using python which you could either run in Databricks notebook or in python local environment. So let dive into it!
Setup Databricks and ADLS account to run sample transformation
First we need to setup Databricks and Azure ADLS (storage account) in order to do some sample transformation. Obviously our focus in the lab is not IaC and the easiest way is via manual efforts. However if you are interested in IaC, you can refer to my other post Secure Databricks where I focused on setting up everything using terraform.
Create Databricks clusters
You could easily create cluster using the interactive wizard in Azure portal and I hope that is smooth experience for you.
Create ADLS account
The next step is to create a ADLS account. It can be easily created in the portal with catch to remember to tick the ADLS option in the wizard. The namespace/folder structure inside ADLS that I had for this lab are as the following:
adls account
    - land (container)
    - dbr (container)
        - ingested (folder)
        - curated (folder)
Load and transform sample data
We can grab some data from Databricks sample data store that is available when the Databricks cluster is created. If we do file list at the following location, we could see the files that we use.
/databricks-datasets/nyctaxi
Lets use one of the green taxi file with the taxi zone lookup file. Please refer to the following for the path of the file we sue
/databricks-datasets/nyctaxi/taxizone/taxi_zone_lookup.csv
/databricks-datasets/nyctaxi/tripdata/green/green_tripdata_2009-05.csv.gz
First I will copy the sample csv “green_tripdata_2009-05.csv.gz” into the landing zone by running the following in my notebook:
dbutils.fs.cp(
    "/databricks-datasets/nyctaxi/tripdata/green/green_tripdata_2019-12.csv.gz",
    "abfss://land@blkdatalake.dfs.core.windows.net/trip_data/green_tripdata_2019-12.csv.gz")

dbutils.fs.cp(
    "/databricks-datasets/nyctaxi/taxizone/taxi_zone_lookup.csv",
    "abfss://land@blkdatalake.dfs.core.windows.net/zone_lookup/taxi_zone_lookup.csv")
Once file is copied, I can then read it and write it to the ingested folder to simulate data ingestion using the following:
df_trip = spark.read
    .options(header="True")
    .csv("abfss://land@blkdatalake.dfs.core.windows.net/trip_data/green_tripdata_2009-05.csv.gz")

df_trip.write.mode("overwrite").format("delta").save("abfss://dbr@blkdatalake.dfs.core.windows.net/ingested/trip_data")

df_zone = (spark.read
    .options(header="True")
    .csv("abfss://land@blkdatalake.dfs.core.windows.net/zone_lookup/taxi_zone_lookup.csv"))

df_zone.write.mode("overwrite").format("delta").save("abfss://dbr@blkdatalake.dfs.core.windows.net/ingested/zone_data")
Lets inspect both taxi data and zone data to see what transformation we could do for this lab.
In the following green taxi data, the PULocationId and DOLocationId columns indicates the zone code for the location.
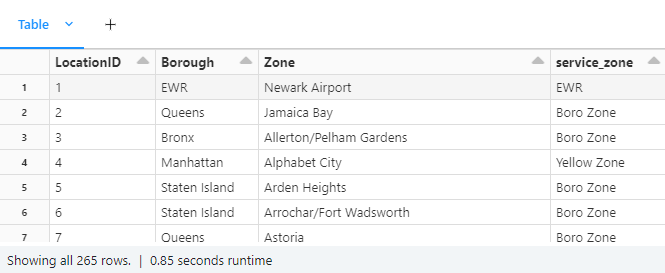
 The zone data in the following is a reference table where we could look up the zone name by its id.
 So here is an idea for transformation, lets replace the zone id with zone name using the lookup table. So lets start !
First lets create some tables using the data we have ingested.
So here is an idea for transformation, lets replace the zone id with zone name using the lookup table. So lets start !
First lets create some tables using the data we have ingested.
%sql
create table if not exists nyctaxi_trip using delta location 'abfss://dbr@blkdatalake.dfs.core.windows.net/ingested/trip_data';
create table if not exists nyctaxi_zone using delta location 'abfss://dbr@blkdatalake.dfs.core.windows.net/ingested/zone_data';
Now that we have the data in the delta table, lets look at our transformation SQL script. The transformation logic is fairly simple, create CTE by lookup up the zone id from zone table, join it with trip data and then select the columns we are interested to form the nyctaxi_curated_tbl table. So lets run that in the notebook.
%sql
create or replace table nyctaxi_curated_tbl using delta location 'abfss://dbr@blkdatalake.dfs.core.windows.net/curated/trip_data'
as (
    with temp as (
        select
        lpep_pickup_datetime as pickup_time,
        lpep_dropoff_datetime as dropoff_time,
        PULocationID,
        DOLocationID,
        z.Zone as pickup_zone,
        z.LocationID as pickup_zone_id,
        x.Zone as dropoff_zone,
        x.LocationID as dropoff_zone_id
        from nyctaxi_trip t left join nyctaxi_zone z on t.PULocationID = z.LocationID left join nyctaxi_zone x on t.DOLocationID = x.LocationID
    )
    select pickup_time, dropoff_time, pickup_zone, dropoff_zone from temp);
Now we should have the sample data in place so lets move to next part where we use purview to scan those assets.
Setup Purview and scan the assets
In this section we need to create Purview instance manually and scan the our ADLS account.
Create Purview instance
The process of creating Purview instance is straight forward, one can follow this doc for more details.
Scan ADLS assets
Once Purview is created, we can start scanning our ADLS account. First lets create some logical construct to keep our assets what is so called a collection in Purview. Its pretty effortless to create a collection, the quick doc has all you need to create the collection.
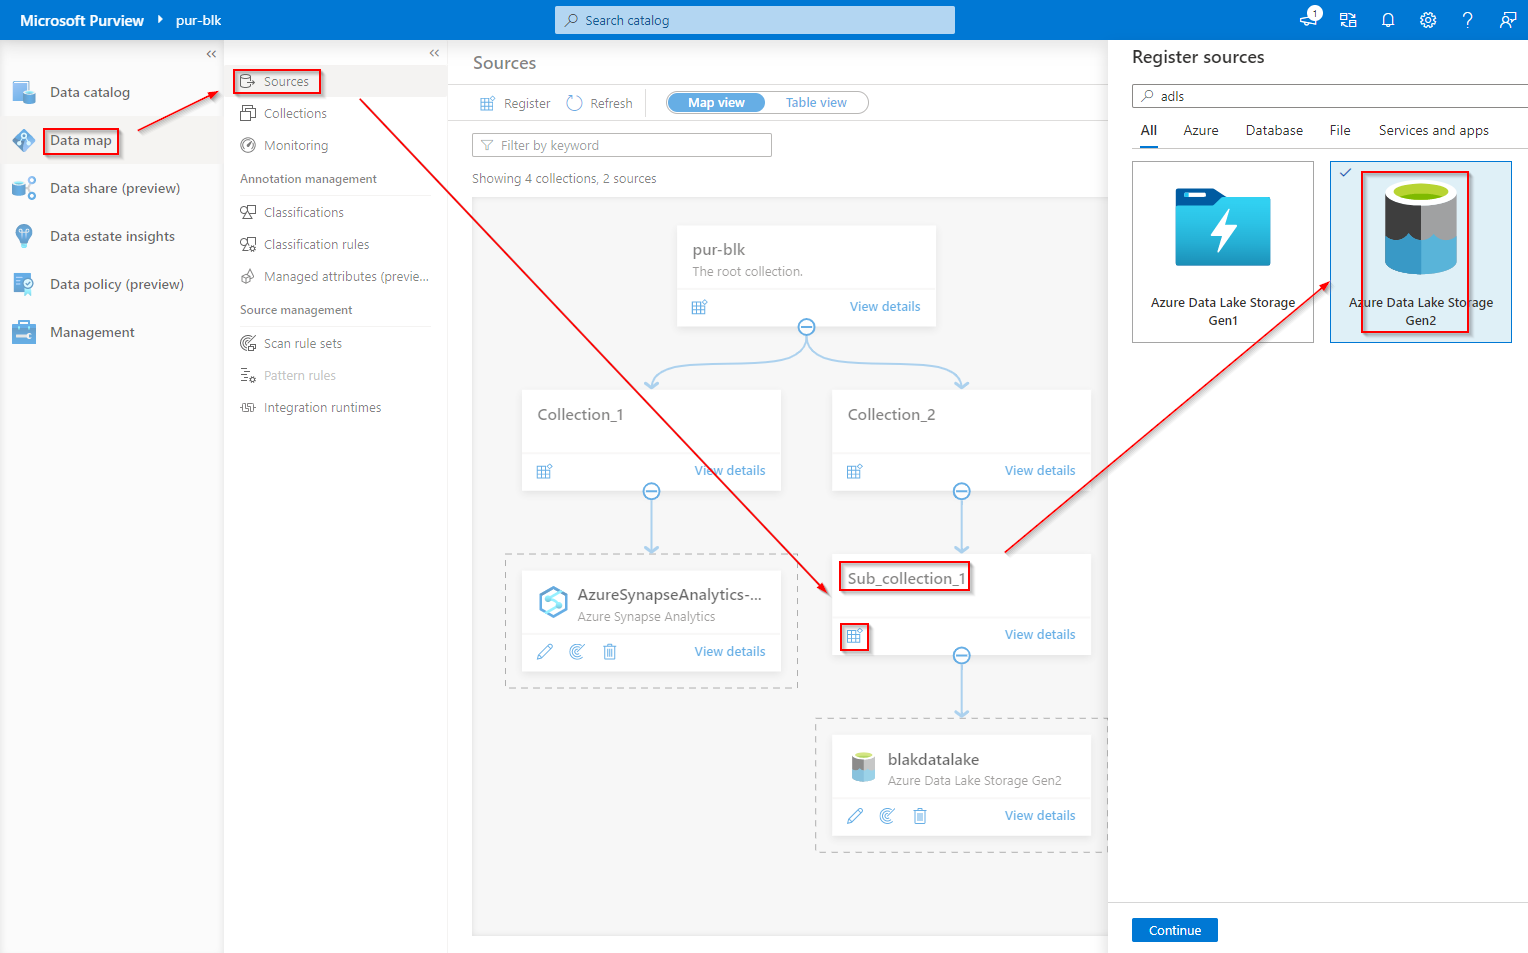
With some collection created, now its time to register our assets.
Follow screenshots below and click continue to proceed to asset registration.
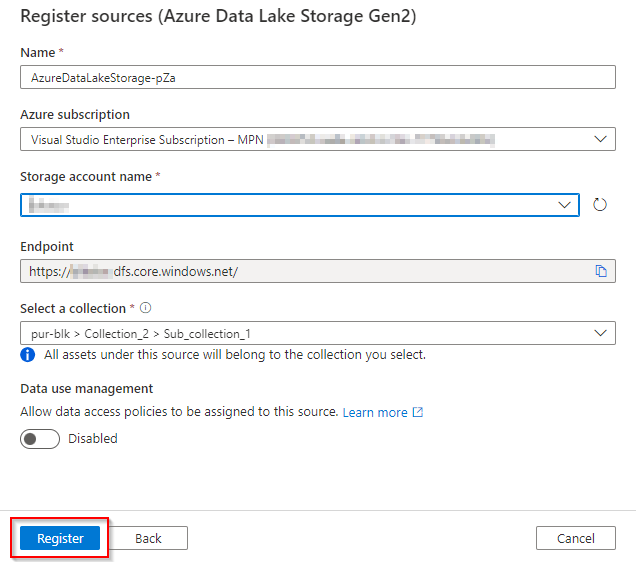
 Follow the prompt and select the ADLS (storage account) that your used in the previous steps and hit register.
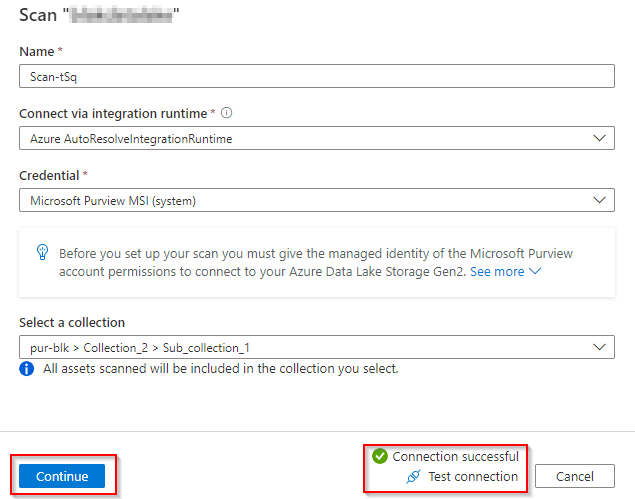
 The guide will take you to the next part to create scan, in this part you can also test the connection between Purview and ADLS.
If you are working on a fresh setup you will need to do a role assignment so that you Purview system managed identity has the “Storage blob contributor” access to you ADLS.
The guide will take you to the next part to create scan, in this part you can also test the connection between Purview and ADLS.
If you are working on a fresh setup you will need to do a role assignment so that you Purview system managed identity has the “Storage blob contributor” access to you ADLS.
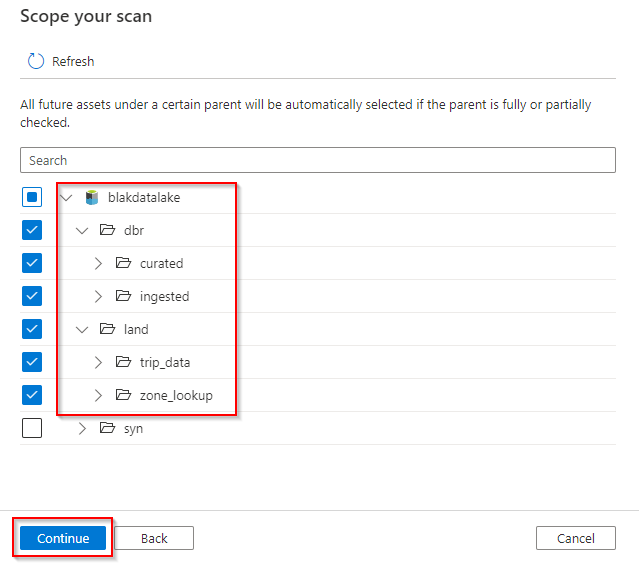
 Once all set, please click continue, this will take you to another screen where you select the folders to be scanned. The folder structure should reflect to what we have done in Databricks in previous steps.
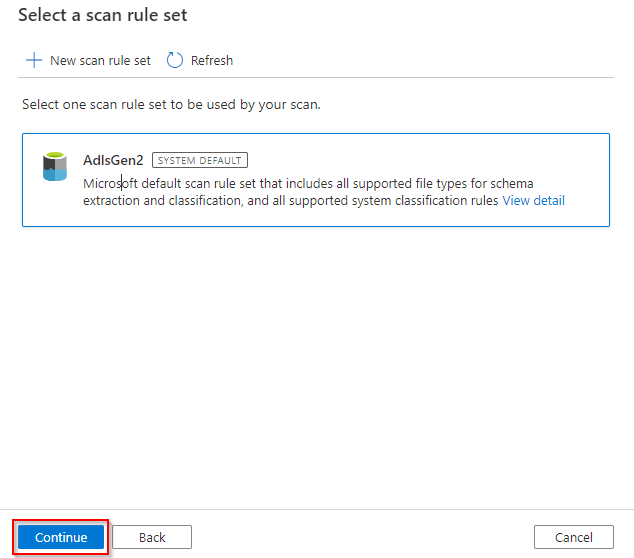
 Click “continue” and we will see the prompt ask us to select the scan rule set, please select the default rule. Alternatively you can also create custom rule to include/exclude certain file types here.
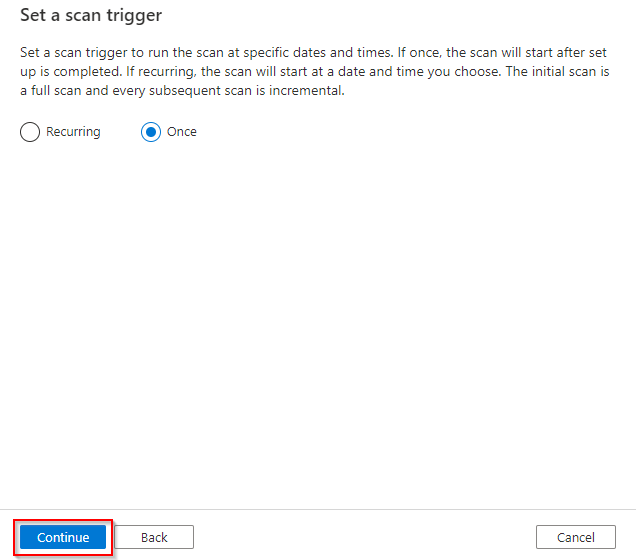
 At this window we could setup the recurrence for the scan. Or, for our lab purpose we can select “once” and hit continue.
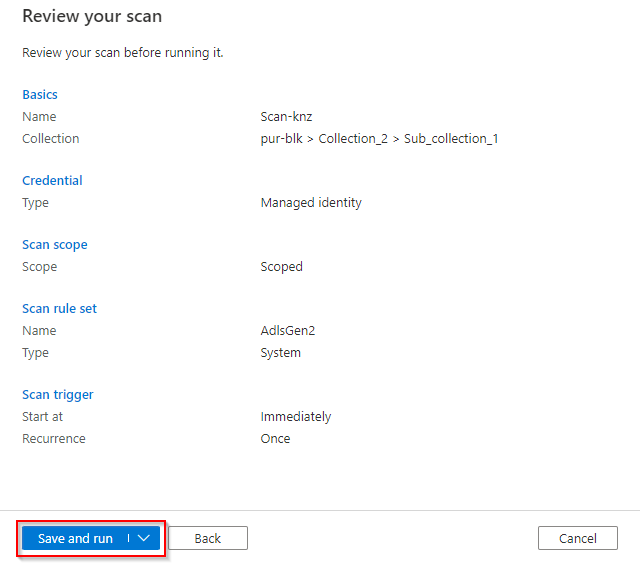
 In the last window, lets review our setup and if all correct let click “save & run”.
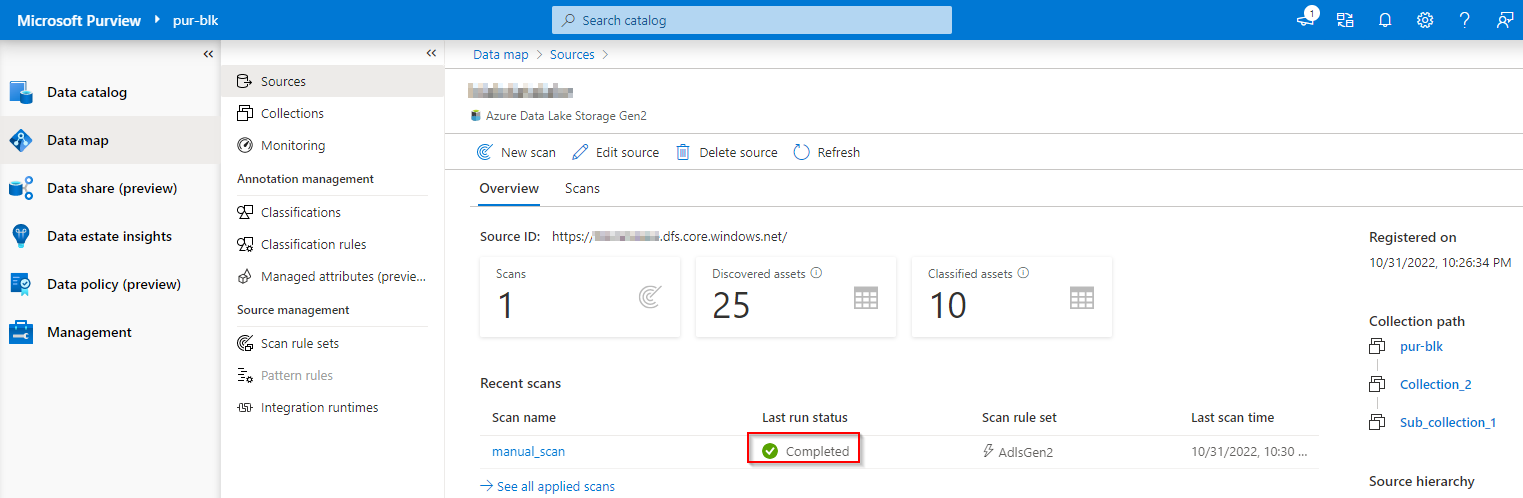
 Allow the scan to run for a few minute before you see the complete status. Navigate to your assets and click “details” in your registered assets, you will see the scan history.
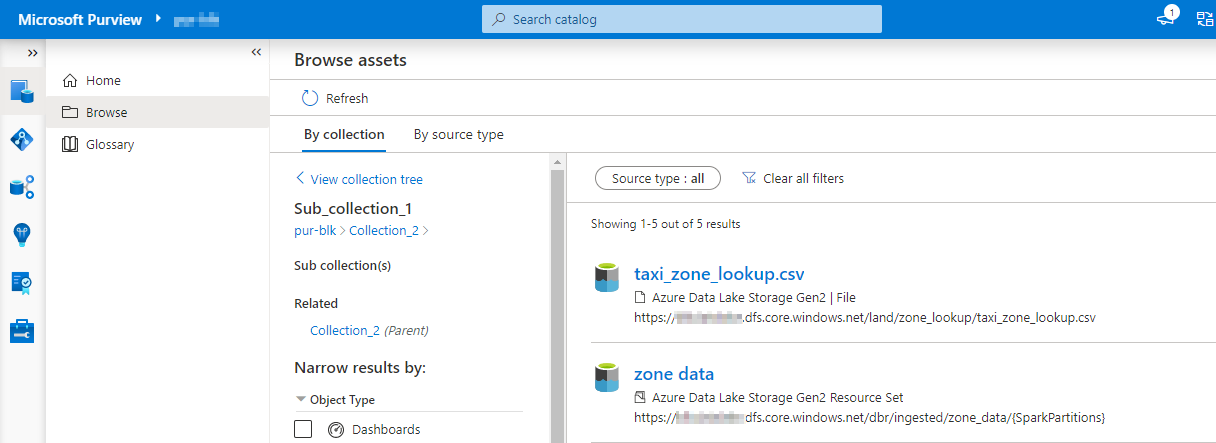
 At this point when we navigate to “Data catalogue” and start browsing, we should be able to see some assets there.
Create manual lineage using python
With all the assets setup in Purview, now lets start the fun and create some manual lineage using python.
This is little bit painful compare to the auto scan, but hey, thats where the value of automation kicks in to Data governance right ?!
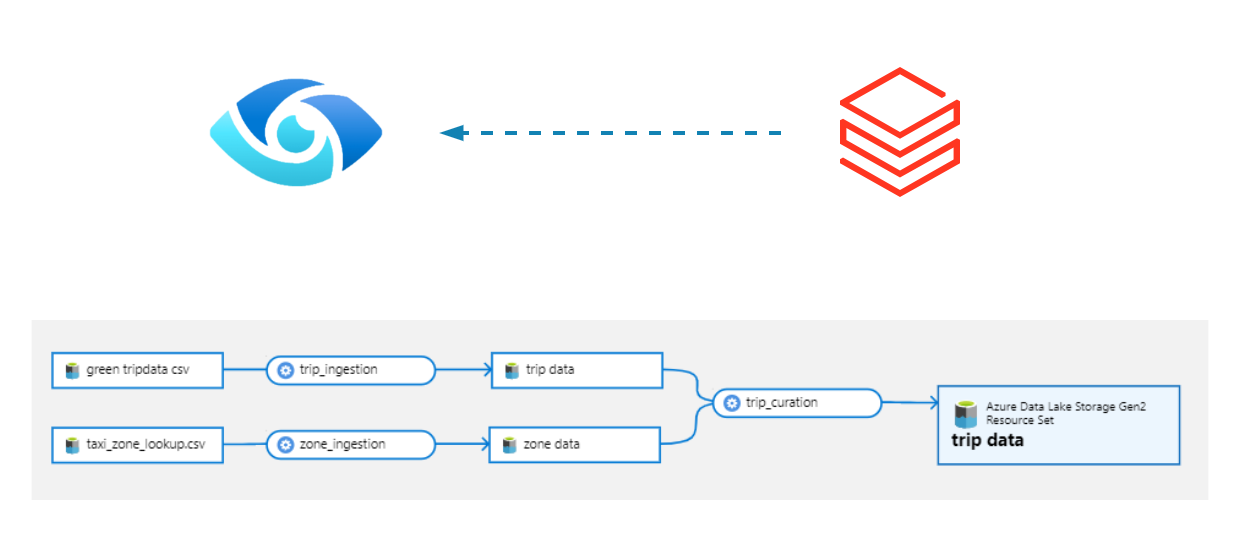
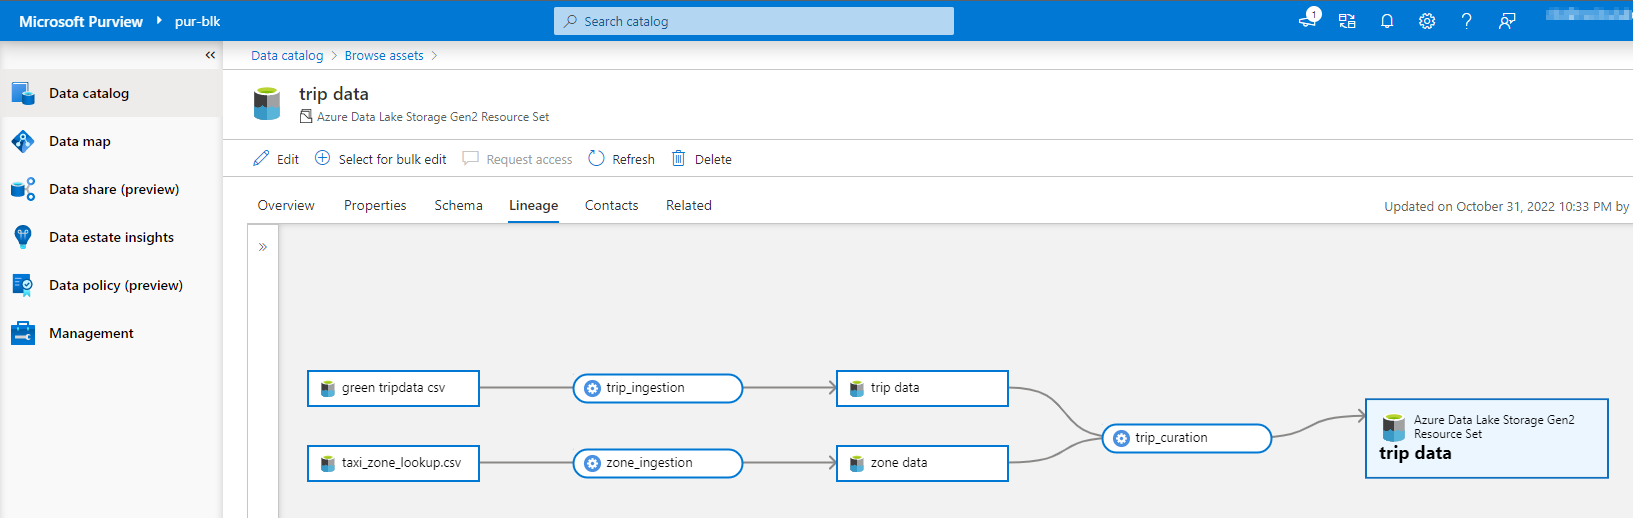
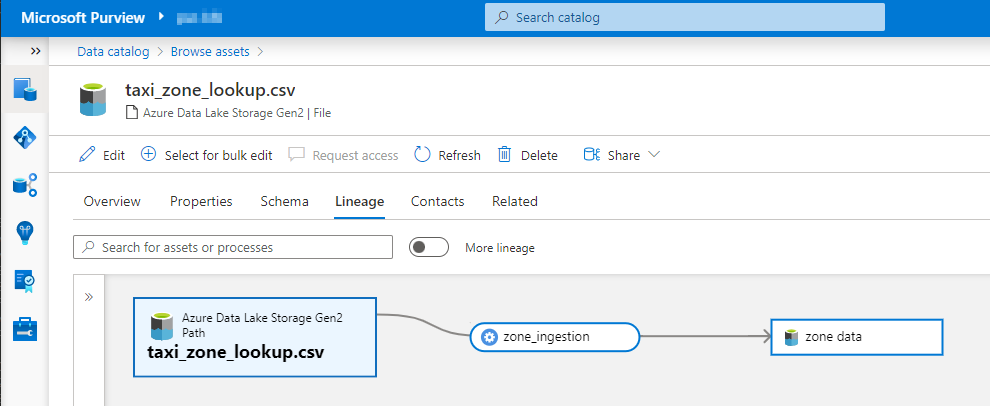
The final outcome of the lineage looks pretty good, we can see the ingestion step as well as the join action of two datasets to form the final curated dataset. Though its missing the column level lineage, but one step at a time !
 Lets dive into some python code snippet and find out how we can easily create manual lineage!
Setup python environment and dependencies
The python package we use to do this can be found here in pypi. Thanks to all the contributors.
There are couple of ways to run the python script, either in your local python virtual environment or in databricks notebook. I have chosen to run the python scripts locally, therefore I have created a virtual env and installed the required packages.
Code deep dive
The first block sets up the import and create a client using service principal authentication.
from html.entities import entitydefs
from pyapacheatlas.auth import ServicePrincipalAuthentication
from pyapacheatlas.core import PurviewClient, AtlasEntity, AtlasProcess
import json
import uuid
import logging

logging.basicConfig()
logging.getLogger().setLevel(logging.DEBUG)

auth = ServicePrincipalAuthentication(
    tenant_id = "your azure tenant id",
    client_id = "your service principal id",
    client_secret = "your service principal secret"
)

client = PurviewClient(
    account_name = "you purview account",
    authentication = auth
)
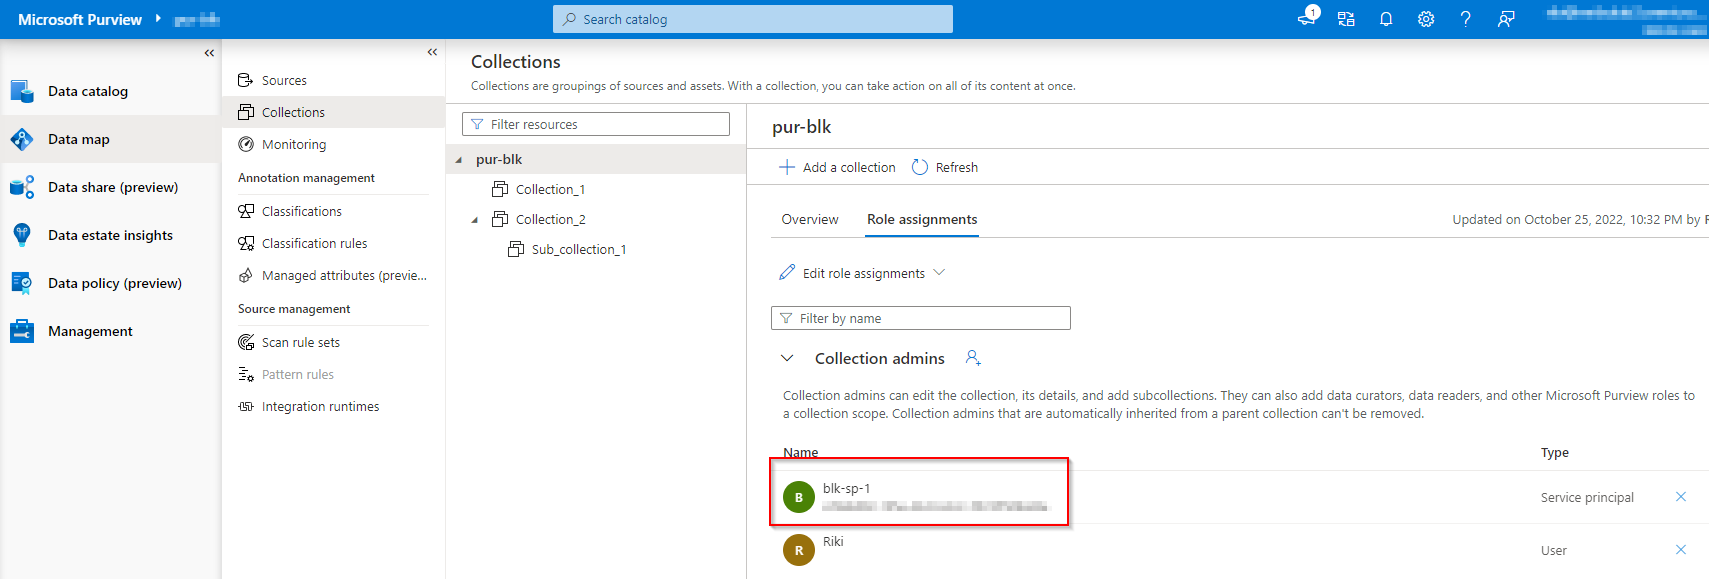
This part assumes that you have already created a service principal and completed the role assignment to it in purview with “Collection Admins” in the root collection.
For carrying on our lab we can start with “Collection Admins” followed by a security hardening process to reduce the permissions for the service principal later on.
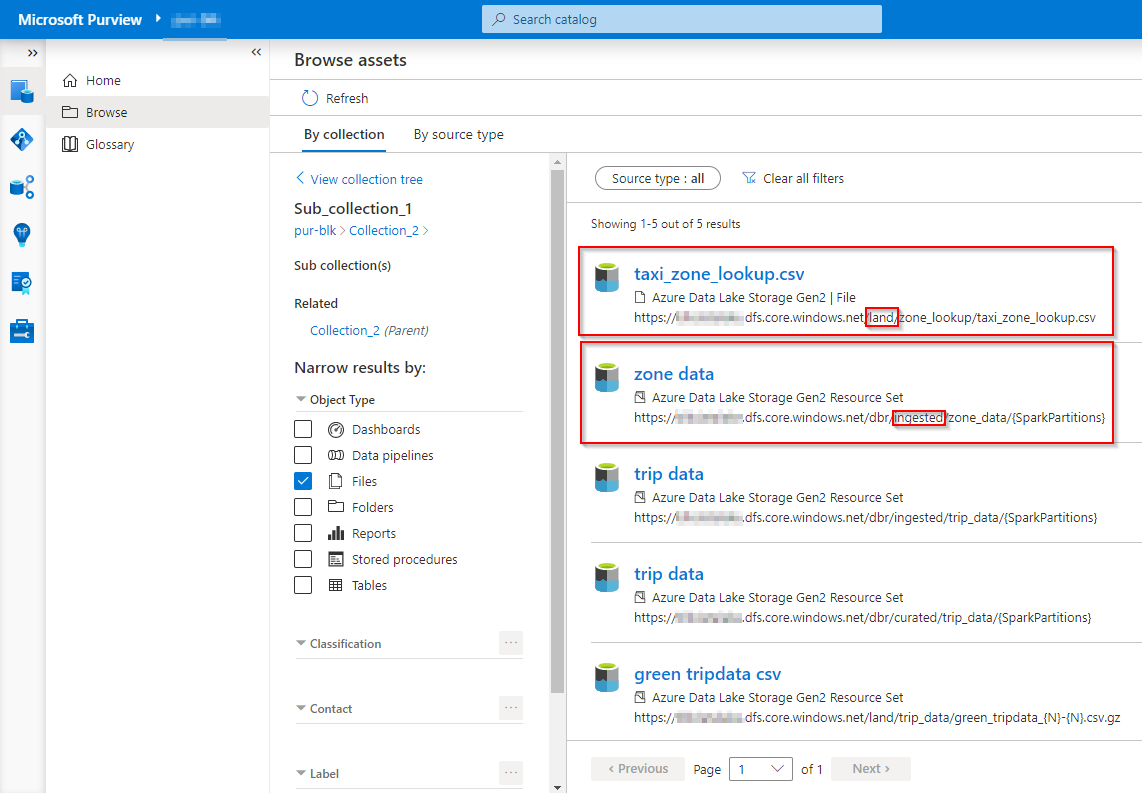
 Since our successful scan has brought us some registered assets, therefore we can retrieve them from Purview and use them in the lineage graph.
The concept of lineage graph can be be interpreted as simple as that you have a process that takes an input and generates output. Therefore the logic would be [list of inputs] -> process -> [list of outputs]. I have some inline documentation to explain what does each part do.
# This block uses the client to retrieve a entity(asset) create by the scan using its guid.
# I will explain how to find the guid in the portal very soon.
zone_data_land = client.get_entity(
    guid="0c75617c-xxxx-4e1f-b972-655e0a09e0b7"
)

# Create a Atlas entity using the information of the asset retrieved by its id in the previous block.
# In this case we are creating the input entity
input_zone = AtlasEntity(
    name=zone_data_land["entities"][0]["attributes"]["name"],
    typeName=zone_data_land["entities"][0]["typeName"],
    qualified_name=zone_data_land["entities"][0]["attributes"]["qualifiedName"],
    guid="0c75617c-xxxx-4e1f-b972-655e0a09e0b7"
)

# This block uses the client to retrieve a entity(asset) create by the scan using its guid.
zone_data_ingested = client.get_entity(
    guid="d714587f-xxxx-4190-8f5f-54dfe27a58b5"
)

# Create a Atlas entity using the information of the asset retrieved by in id in the previous block.
# In this case we are creating the output entity generated by the process
output_zone = AtlasEntity(
    name=zone_data_ingested["entities"][0]["attributes"]["name"],
    typeName=zone_data_ingested["entities"][0]["typeName"],
    qualified_name=zone_data_ingested["entities"][0]["attributes"]["qualifiedName"],
    guid="d714587f-xxxx-4190-8f5f-54dfe27a58b5"
)

# Create a Atlas process that links the input and the output
# Note the input and output parameter of AtlasProcess class, it is list type but at the moment there is only one object in it.
zone_process = AtlasProcess(
    name="zone_ingestion",
    typeName="Process",
    qualified_name="pyspark://zone_ingestion",
    inputs=[input_zone],
    outputs=[output_zone],
    guid=f"-{uuid.uuid4()}"
)

# Create the process and upload it.
results = client.upload_entities(
    batch=[input_zone, output_zone, zone_process]
)
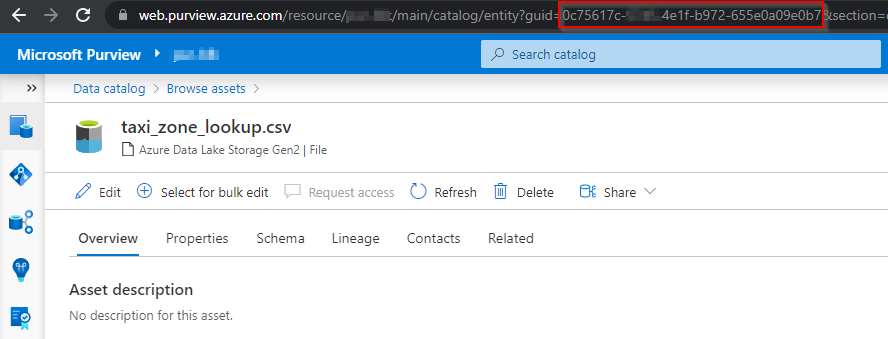
The above code requires you to know the guid of the entity that you wanted to bind to the process.
It is fairly simple to get by navigating to purview, simply go the asset that you are interested in and you can find the guid in the browser link.
This seems to be a bit “anti-automation” but with some good investigation to the pyapacheatlas, you would be able to retrieve the entity by its “name” and “typeName”. The official documentation is your best friend to investigate the automation for this part.
For our lab purpose lets find it from the browser link.
You can now see these two datasets are the one used in the input and output.
 Note the guid which was used in looking up the input dataset
 When finished with python setup simply run the code snippet we’v got so far.
If everything is happening as intended, you should be able to see the lineage when you navigate to the lineage tab of your zone data asset.
When finished with python setup simply run the code snippet we’v got so far.
If everything is happening as intended, you should be able to see the lineage when you navigate to the lineage tab of your zone data asset.
 The following code is pretty much the same to the previous block, only difference is that it is building the lineage for the other trip dataset that we are going to use in the join. So I will skip explanation for this part.
trip_data_land=client.get_entity(
    guid="5e0a1aeb-xxxx-4deb-86aa-f1ce8945e6db"
)

input_trip = AtlasEntity(
    name=trip_data_land["entities"][0]["attributes"]["name"],
    typeName=trip_data_land["entities"][0]["typeName"],
    qualified_name=trip_data_land["entities"][0]["attributes"]["qualifiedName"],
    guid="5e0a1aeb-xxxx-4deb-86aa-f1ce8945e6db"
)

trip_data_ingested=client.get_entity(
    guid="d68138fe-xxxx-454f-9d26-581af01787f2"
)

output_trip = AtlasEntity(
    name=trip_data_ingested["entities"][0]["attributes"]["name"],
    typeName=trip_data_ingested["entities"][0]["typeName"],
    qualified_name=trip_data_ingested["entities"][0]["attributes"]["qualifiedName"],
    guid="d68138fe-xxxx-454f-9d26-581af01787f2"
)

trip_process = AtlasProcess(
    name="trip_ingestion",
    typeName="Process",
    qualified_name="pyspark://trip_ingestion",
    inputs=[input_trip],
    outputs=[output_trip],
    guid=f"-{uuid.uuid4()}"
)

results = client.upload_entities(
    batch=[input_trip, output_trip, trip_process]
)
When completed adding the snippet, please run the python script again and inspect to make sure you’v got lineage for the trip dataset.
The very last bit is to build the lineage graph for the join action. The logic behind this is the same, this time we are using the output entity as the input entity for the next join process. Note the “input” and “output” parameter in the “AtalasProcess” object, this time it includes two items to reflect a join action. When you finish the coding, run the completed script again and you should be able to see the lineage graph you see at the beginning of the section.
trip_data_curated=client.get_entity(
    guid="6bb1ed88-xxxx-4b9a-bb0f-96c37c35b57f"
)

output_trip_curated=AtlasEntity(
    name=trip_data_curated["entities"][0]["attributes"]["name"],
    typeName=trip_data_curated["entities"][0]["typeName"],
    qualified_name=trip_data_curated["entities"][0]["attributes"]["qualifiedName"],
    guid="6bb1ed88-xxxx-4b9a-bb0f-96c37c35b57f"
)

input_trip_curation = AtlasEntity(
    name=trip_data_ingested["entities"][0]["attributes"]["name"],
    typeName=trip_data_ingested["entities"][0]["typeName"],
    qualified_name=trip_data_ingested["entities"][0]["attributes"]["qualifiedName"],
    guid="d68138fe-xxxx-454f-9d26-581af01787f2"
)

input_zone_curation = AtlasEntity(
    name=zone_data_ingested["entities"][0]["attributes"]["name"],
    typeName=zone_data_ingested["entities"][0]["typeName"],
    qualified_name=zone_data_ingested["entities"][0]["attributes"]["qualifiedName"],
    guid="d714587f-xxxx-4190-8f5f-54dfe27a58b5"
)

trip_process_curated = AtlasProcess(
    name="trip_curation",
    typeName="Process",
    qualified_name="pyspark://trip_curation",
    inputs=[input_trip_curation, input_zone_curation],
    outputs=[output_trip_curated],
    guid=f"-{uuid.uuid4()}"
)

results = client.upload_entities(
    batch=[input_trip_curation, input_zone_curation, output_trip_curated, trip_process_curated]
)
Closing Note
Congrats ! You’v reached to the end of this post on manual lineage. Thank you for your patience too ! The code in this lab is only intended to be used as snippets, you will obviously need some careful scheme to turn it into production ready code. But you get the gist right ?! It only take “little bit” more efforts to make it perfect ! Hope by now you have a good idea of building manual lineage in such situation when the auto scan does not suite.
In part B of this topic on Purview lineage, I will explore how we can connect Purview to Databricks Hive Metadata store and see if we can capture the lineage by scanning it. Stay tuned and keep safe !